You can transform your tiny space into a Halloween haven with these clever DIY tricks: hang lightweight paper bats from adhesive hooks for vertical drama, swap regular throw pillows for dark ones with spiderweb doilies, create spooky window silhouettes using black contact paper, and build miniature graveyard scenes in shallow boxes. Add battery-operated blinking eyes to bookshelves, replace fresh flowers with bare branches in vases, and string orange LEDs behind sheer fabric for eerie shadows that’ll reveal even more spine-tingling possibilities.
Design Highlights
- Create floating ghost effects using white sheets and fishing line, or cut paper bats from black construction paper for dramatic vertical wall displays.
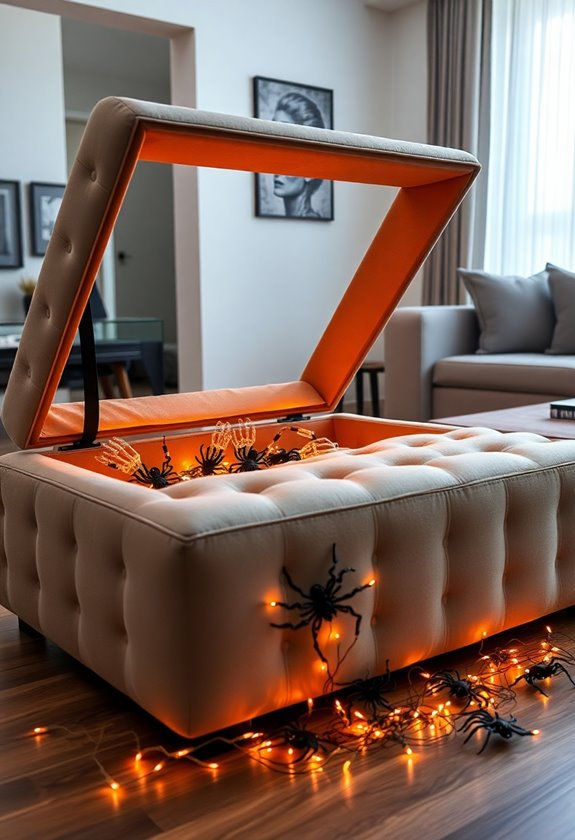
- Transform existing furniture with hidden Halloween elements like skeleton hands in ottomans or motion-activated blinking eyes on bookshelves.
- Use black contact paper silhouettes on windows and hang fabric panels at doorways for instant haunted transformations without floor space.
- Build miniature tabletop scenes in shallow boxes with cotton batting fog, cardboard tombstones, and flickering battery-operated candles for compact spookiness.
- Swap everyday items like throw pillows for dark colors, replace family photos with horror posters, and fill vases with bare branches.
Vertical Wall Displays That Maximize Impact Without Floor Space

When you’re working with limited floor space but want maximum Halloween impact, vertical wall displays become your secret weapon for creating spine-tingling atmosphere. I learned this trick while filming a horror short in my cramped dorm room, where every square inch counted.
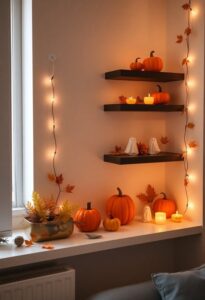
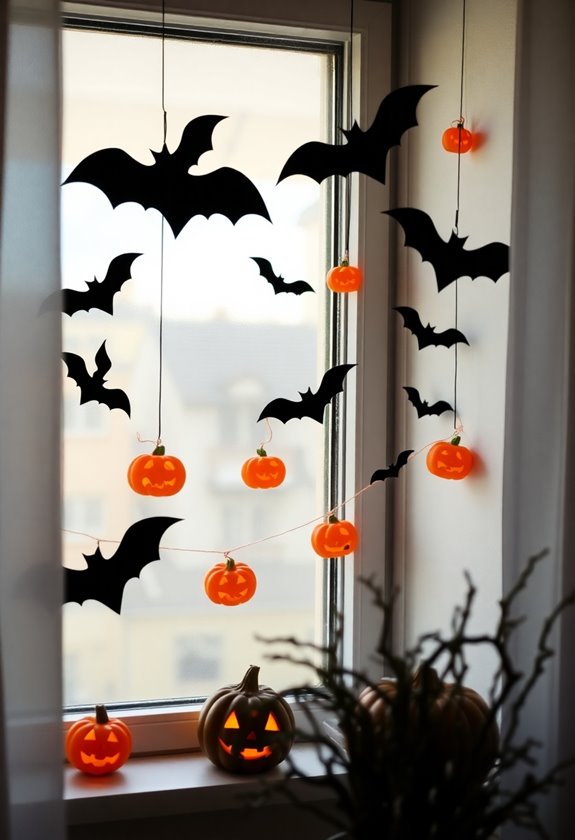
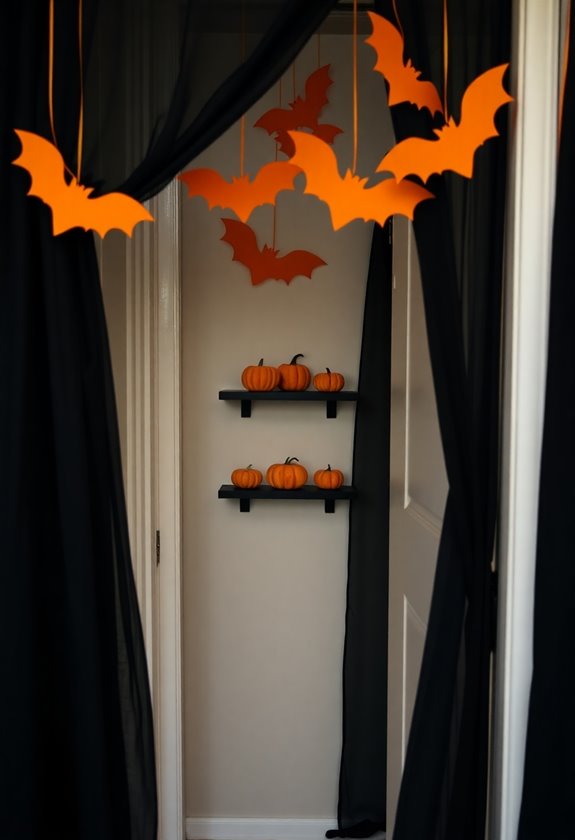
Start with adhesive hooks to hang lightweight paper bats cascading down your walls—they create incredible movement and depth. I’ve discovered that black construction paper works perfectly, and you can cut dozens in minutes. For dramatic lighting, string orange LED lights behind sheer fabric or cheesecloth to cast eerie shadows.
Wall decals transform plain surfaces instantly. Ghost silhouettes, creepy trees, or haunted mansion scenes add instant drama without permanent damage. My favorite hack? Create a “floating” ghost using white sheets and fishing line attached to ceiling hooks. The translucent effect looks mysteriously realistic, especially when backlit. These vertical displays draw eyes upward, making your space feel larger while delivering serious Halloween thrills. Additionally, consider incorporating Halloween sidewalk decor to enhance the overall spooky vibe of your small space.
Multi-Purpose Furniture With Hidden Halloween Surprises
Since you’re already investing in furniture for your space, why not choose pieces that pull double duty as Halloween decor? I learned this trick during my first apartment days when I couldn’t afford separate seasonal decorations. You’ll love how these clever furniture hacks transform ordinary pieces into spooky surprises.
Here are three game-changing ideas I’ve perfected over the years:
- Ottoman storage with hidden skeleton hands – Cut small slits in your ottoman’s fabric and insert realistic skeleton fingers that peek out unexpectedly.
- Coffee table with secret compartments – Create false bottoms filled with creepy crawlies that guests discover when they lift magazines or coasters.
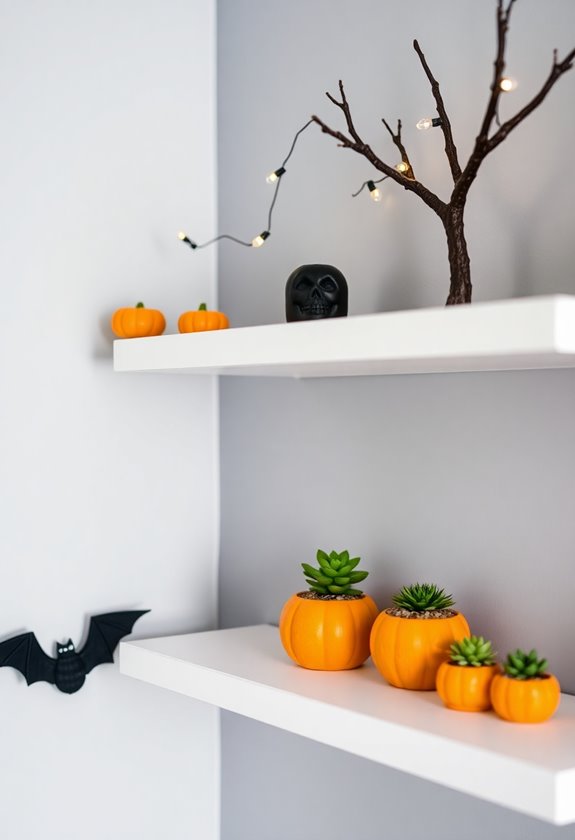
- Bookshelf with moving eyes – Install battery-operated eyes behind book spines that blink when motion’s detected.
These pieces work year-round, then surprise your guests during Halloween. Trust me, nothing beats the genuine screams when someone discovers your furniture’s dark secrets! Your small space becomes mysteriously interactive without sacrificing functionality. To make your kitchen even more festive, consider incorporating Halloween table decor ideas that will complement your spooky furniture transformations.
Compact Window Clings and Silhouettes for Instant Atmosphere
While furniture tricks work magic indoors, your windows offer the perfect canvas for creating spine-chilling atmosphere that’s visible from both sides of the glass. I’ve discovered that window clings transform any space instantly, and they’re ridiculously easy to make.
Cut spooky silhouettes from black contact paper—think bats, cats, or creepy trees. When I first tried this, I went overboard with intricate designs and nearly lost my mind cutting tiny details. Keep it simple! Bold shapes work best and show up dramatically at night.
Less is more when creating window silhouettes—bold, simple shapes create maximum spooky impact without the cutting frustration.
For removable clings, mix corn syrup with food coloring to create “blood” drips that stick temporarily. You can also use white soap to draw ghostly figures directly on glass. The beauty lies in layering different elements—I love combining solid silhouettes with translucent effects.
Position battery-operated LED strips behind your creations for an eerie backlit glow that’ll make neighbors do double-takes. Additionally, consider browsing Halloween kitchen decor ideas for more festive inspiration to enhance your spooky setup.
Space-Saving Door and Entryway Transformations
Because your front door gets the most traffic on Halloween night, it deserves special attention that won’t crowd your precious space. You’ll love how these clever transformations create maximum impact without eating up your entryway.
I’ve discovered that vertical decorating is your best friend here. When I first moved into my tiny apartment, I thought I’d have to skip door decorations entirely – boy, was I wrong! Here are my go-to space-saving solutions:
- Hanging fabric panels – Drape black or orange sheets from your door frame to create an instant haunted entrance
- Stackable pumpkin tower – Build upward instead of outward using graduated pumpkin sizes
- Wall-mounted skeleton hands – Attach them reaching around your door frame for creepy dimension
You can also swap your regular doormat for a Halloween-themed one, and don’t forget string lights! They’ll add spooky ambiance without taking up any floor space whatsoever. Consider incorporating Halloween decor ideas that enhance your entryway without overwhelming it.
Miniature Tabletop Scenes That Pack Maximum Spook
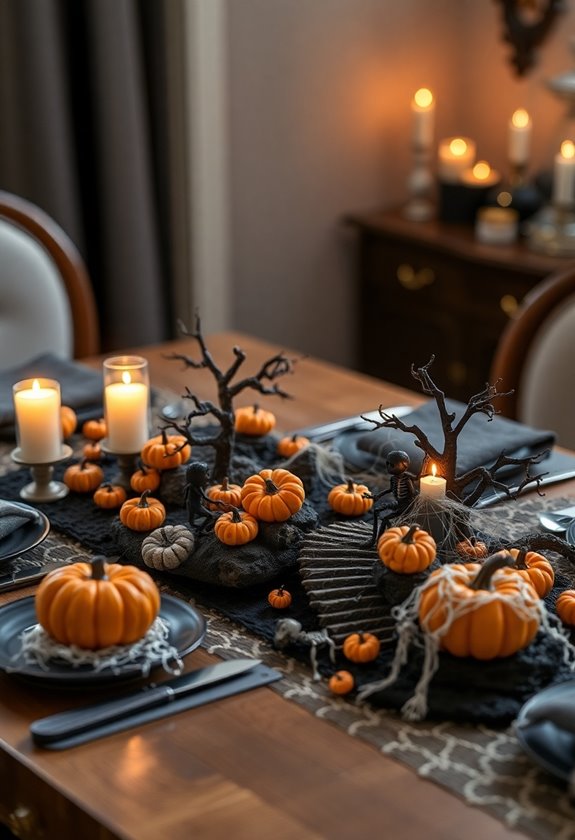
When table space is limited, creating haunting miniature scenes becomes an art form that’ll transform even the smallest surface into a spine-tingling display.
I learned this trick while decorating my cramped dorm room – you don’t need sprawling space to create maximum impact. Start with a shallow box or picture frame as your base, then build layers using cotton batting for fog, tiny LED lights for eerie glows, and miniature figurines positioned strategically.
My favorite scene features a graveyard made from cardboard tombstones, plastic skeletons peeking through Spanish moss, and battery-operated candles flickering behind translucent fabric ghosts. The key is creating depth – place larger elements in back, smaller ones in front.
For instant atmosphere, add sound effects from your phone hidden beneath the display. These compact dioramas work perfectly on nightstands, desks, or windowsills, proving that sometimes the smallest spaces pack the biggest scares. Additionally, you can find Halloween garage decor ideas to inspire even more spooky decorations for your home.
Hanging Decorations That Create Depth in Small Rooms
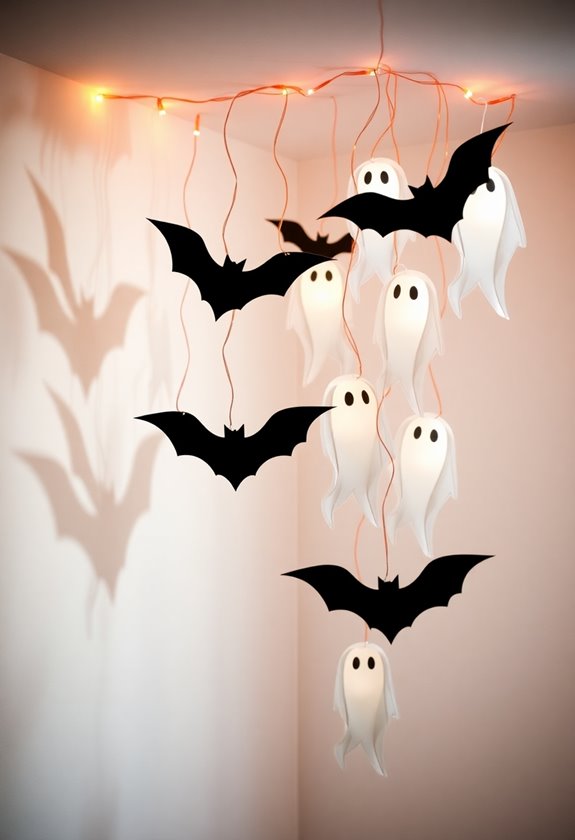
Since vertical space is your secret weapon in cramped quarters, hanging decorations can transform a tiny room into a haunting three-dimensional experience that’ll make guests forget they’re in a shoebox apartment.
Transform your cramped quarters into a haunting three-dimensional experience using vertical space as your secret decorating weapon.
I’ve learned from years of creating spooky sets that layers create magic. When I hang decorations at different heights, suddenly my cramped living room becomes a mysterious forest or haunted mansion. You’ll want to use every inch from ceiling to floor.
Here are three game-changing hanging techniques:
- Graduated ghost chains – Hang cheesecloth spirits at varying lengths to create depth
- Floating spider webs – Stretch cotton batting between walls at different heights
- Dangling bat swarms – Cut paper bats and suspend them on fishing line at staggered levels
The trick is creating visual pathways that draw eyes around the room. I always start with my tallest piece near the back wall, then work forward with shorter elements. This simple technique makes even my studio apartment feel like a sprawling haunted estate.
Storage-Friendly Seasonal Swaps for Year-Round Items
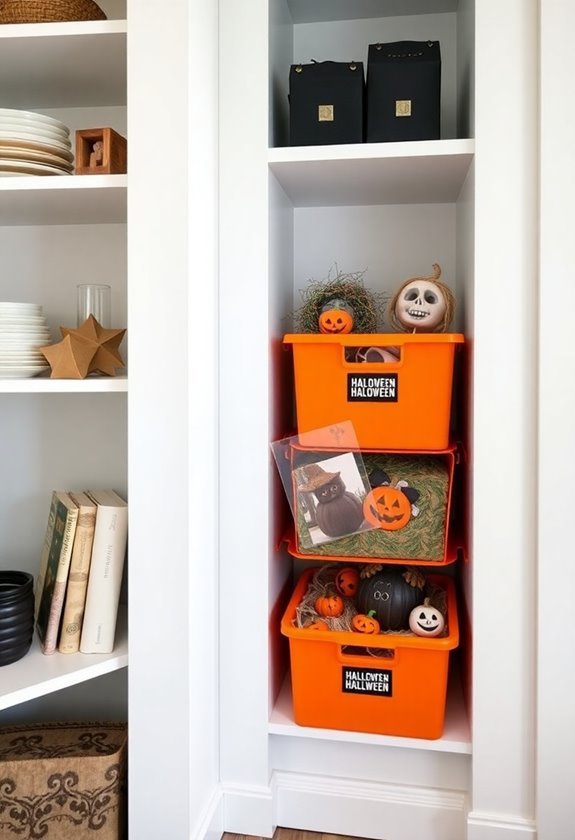
After countless Halloween seasons of cramming decorations into overstuffed closets, I’ve discovered that the smartest spooky makeovers don’t require buying tons of new stuff – they transform what you already own.
You’ll love how easy it is to give everyday items a Halloween twist. Swap your regular throw pillows for dark-colored ones you’ve tucked away, then add spiderweb doilies or bat cutouts. Replace family photos with vintage horror movie posters printed at home – they’ll slide right back into your existing frames come November.
Your bookshelf becomes instantly eerie when you flip books backward, showing only weathered spines, and nestle battery-operated candles between them. Those cheerful kitchen towels? Swap them for deep purples or blacks from your linen closet. Even your everyday vases transform into creepy vessels when filled with bare branches instead of fresh flowers. These simple switches create maximum impact while keeping storage stress to a minimum.
Frequently Asked Questions
What’s the Average Budget Needed for DIY Halloween Decorations in Small Spaces?
You’ll typically spend $15-30 creating spooky magic in your cozy space. I’ve learned that dollar store finds, like plastic spiders and orange streamers, stretch budgets beautifully. You can make ghostly figures from old sheets, craft paper bats for under $5, and transform mason jars into eerie luminaries. The secret’s shopping your own home first—I’ve created haunting displays using items I already owned, spending just $10 on finishing touches.
How Far in Advance Should I Start Making DIY Halloween Decorations?
Time flies like a bat out of a cave when you’re crafting! I’d recommend starting your Halloween decorations three to four weeks early. You’ll avoid the last-minute scramble I faced last year when my paper ghosts weren’t dry by Halloween night. Start with complex projects first, like painted pumpkins or sewn fabric decorations, then tackle quick ones like cutout bats. This timeline gives you breathing room for creative changes and mishaps.
Are There Any Safety Concerns With DIY Halloween Decor in Apartments?
You’ll want to check your lease first—some apartments restrict decorations or candles. I learned this the hard way when my landlord wasn’t thrilled about my fog machine! Keep walkways clear, secure wall hangings properly, and use battery-operated candles instead of real flames. Test smoke detectors before adding any effects, and remember that neighbors share walls. Fire-safe materials are essential, and always have permission for anything permanent or potentially messy.
What Basic Crafting Supplies Do I Need to Get Started?
You’ll need basic scissors, craft glue, and construction paper to start your spooky projects. I always keep orange and black markers handy, plus some string for hanging decorations. Don’t forget tape – both regular and double-sided work great. A few paintbrushes and acrylic paint add professional touches to your creations. Start with these essentials, and you’ll discover what else you need as your crafting adventures grow more ambitious and creative.
How Do I Remove Decorations Without Damaging Rental Property Walls?
You’ll want to use removable adhesive strips, which I’ve learned save deposits! For lightweight decorations, try painter’s tape or removable wall decals. I always test adhesives in hidden corners first—trust me, I’ve made that mistake before. Command strips work great for heavier items, and fishing line creates floating effects without wall damage. Remove everything slowly while warm; cold adhesive becomes stubborn. Your landlord will thank you, and you’ll get that deposit back!