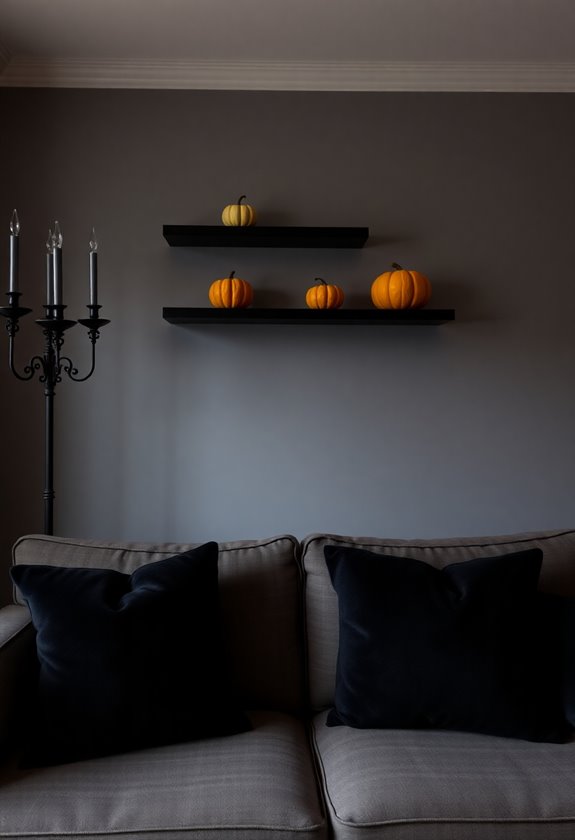
You can transform your small living room into a spine-chilling haunted space by replacing regular bulbs with flickering LED candles and colored lights for eerie ambiance. Create dramatic wall art using black cardstock silhouettes in mismatched vintage frames, then maximize corner spaces with twisted branches draped in orange string lights. Use multi-functional furniture like ottoman coffins for hidden storage, and hang lightweight decorations from ceilings to save precious floor space while creating maximum spooky impact throughout your compact room.
Design Highlights
- Replace regular bulbs with colored LED lights (orange, purple, green) and use flickering candles for safer atmospheric lighting.
- Create dramatic wall art using black cardstock silhouettes in vintage frames and shadow boxes with battery-operated fairy lights.
- Transform corners into focal points with twisted branches, orange string lights, plastic spiders, and clustered fake ravens at different heights.
- Choose multi-functional furniture like ottoman coffins for storage and apothecary cabinets that hide clutter while displaying spooky bottles.
- Maximize vertical space with hanging paper bats, cheesecloth ghosts from curtain rods, and plastic spiders at varying heights.
Transform Your Lighting With Flickering Candles and Colored Bulbs
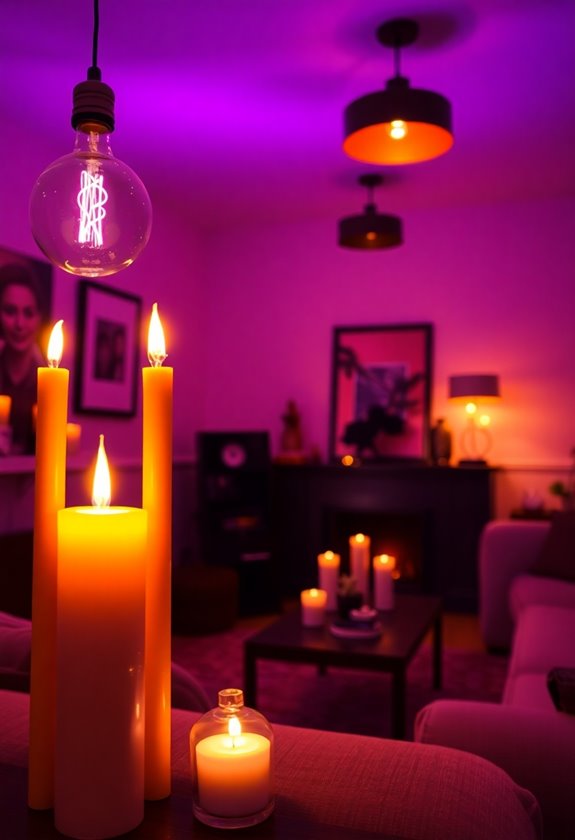
Why settle for boring overhead lighting when you can create spine-tingling ambiance that’ll make your small living room feel like a haunted mansion? I’ve discovered that lighting transforms everything – it’s like directing a horror movie scene right in your own space.
Start with flickering LED candles placed strategically around your room. They’re safer than real flames, and trust me, after nearly setting my curtains ablaze during last year’s Halloween party, safety matters! Battery-operated candles create that eerie glow without the fire hazard.
Battery-operated candles deliver spine-chilling ambiance without the terror of actual fire hazards – learned that lesson the hard way!
Replace your regular bulbs with colored ones – orange, purple, or green work beautifully. I love using orange bulbs in table lamps; they cast mysterious shadows that dance across walls. Purple lighting makes everything feel supernatural, while green gives off that classic monster-movie vibe. You can even enhance the spooky vibe with Halloween bathroom decor that complements your living room theme.
Dim your overhead lights completely and rely solely on these atmospheric sources. You’ll be amazed how this simple lighting switch transforms your cozy space into something genuinely spooky.
Create Dramatic Wall Art Using Silhouettes and Shadow Boxes
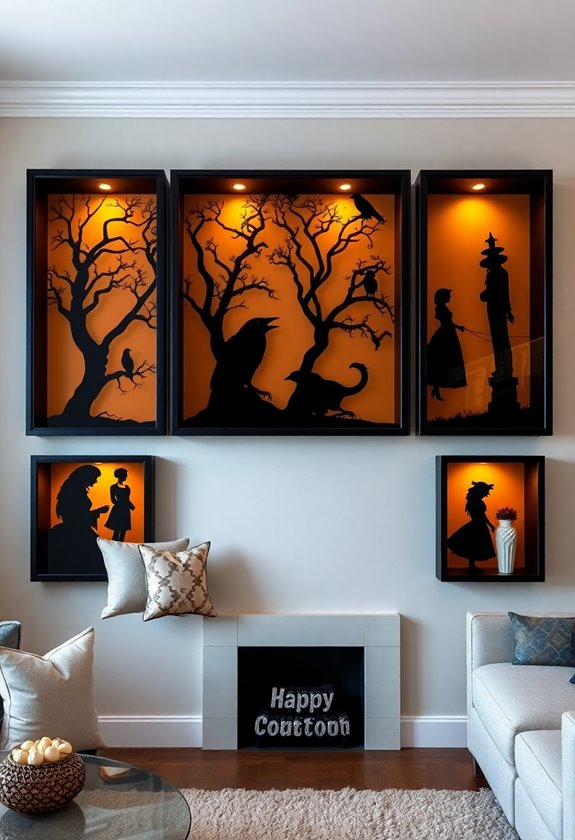
Once you’ve mastered that moody lighting, your walls become the perfect canvas for spine-chilling artwork that’ll make guests do double-takes. I learned this trick while decorating my first tiny apartment – shadow boxes are absolute game-changers for small spaces.
Cut spooky silhouettes from black cardstock: bats, ravens, twisted trees, or haunted houses. Frame them in mismatched thrift store frames for that authentic creepy vibe. I once created an entire graveyard scene using just three different-sized frames, and visitors still ask where I bought it!
Shadow boxes work magic too. Fill them with miniature Halloween scenes – tiny skeletons, plastic spiders, or dried flowers. The depth creates visual interest without eating up precious wall space. Pro tip: use battery-operated fairy lights inside for an eerie glow. Additionally, consider incorporating Halloween decor ideas to really elevate your haunting displays.
Group your pieces in odd numbers, and don’t worry about perfect alignment. Slightly askew artwork actually enhances that unsettling atmosphere you’re after.
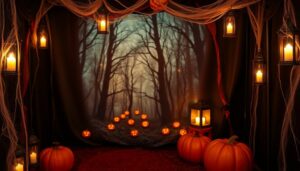
Maximize Corner Spaces With Towering Halloween Trees and Plants
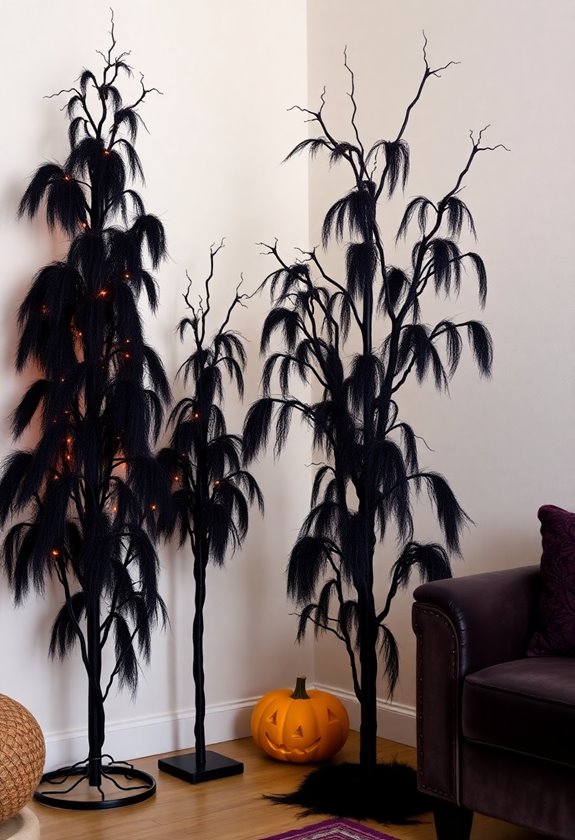
While most people ignore those awkward corner spots, you’re sitting on prime real estate for creating show-stopping Halloween displays that draw the eye upward and make your small room feel dramatically larger.
I learned this trick while decorating my cramped apartment last October. Those bare corners became my secret weapon for spooky magic. You’ll want to start with a tall, twisted branch or artificial Halloween tree – think seven feet if your ceiling allows. Place it diagonally in the corner to maximize visual impact without eating floor space.
Drape orange string lights through the branches, then add dangling plastic spiders or miniature pumpkins. I discovered that clustering fake ravens on different levels creates incredible depth. Around the base, arrange potted plants with dark foliage like purple coleus or black petunias. Incorporating Halloween decor ideas not only enhances the spookiness but also allows for creative expression in your living space.
The vertical drama pulls eyes upward, making your ceiling appear higher while that corner transforms from dead space into your room’s haunting focal point.
Use Multi-Functional Furniture as Hidden Spooky Storage
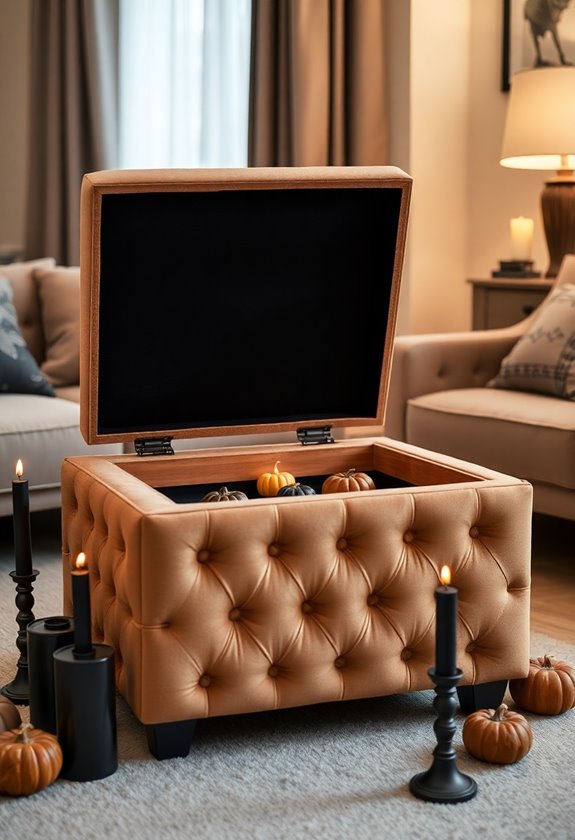
Since space comes at such a premium in small rooms, your Halloween decorations need to earn their keep by serving double duty as both spooky accents and practical storage solutions. I’ve discovered that multi-functional furniture transforms tight spaces into organized haunts without sacrificing style.
Here are three clever storage pieces that’ll keep your space tidy while maintaining the creepy atmosphere:
- Ottoman coffins – These padded “caskets” store blankets, games, or seasonal items while providing extra seating for movie nights.
- Bookshelf apothecary cabinets – Display your spooky bottles and curiosities on top shelves while hiding everyday clutter in decorative boxes below.
- Storage benches disguised as haunted chests – Perfect for stashing shoes, magazines, or craft supplies behind weathered wood and rusty hardware.
Additionally, consider enhancing your decor with spooktacular driveway decor ideas that can keep the Halloween spirit alive even outside your home. You’ll love how these pieces solve storage headaches while amplifying your Halloween theme. Each item works year-round, making them smart investments that adapt to your decorating needs.
Design a Haunting Gallery Wall With Vintage Gothic Frames
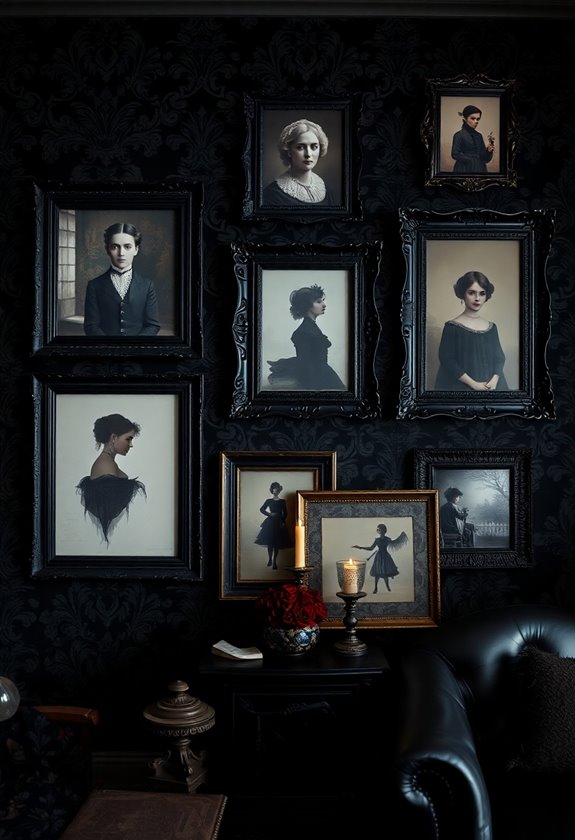
Gallery walls pack serious visual punch in compact spaces, and I’ve found that vintage gothic frames create the perfect foundation for a spine-tingling display that won’t overwhelm your room. You’ll want to hunt for ornate frames with intricate details—think carved roses, twisted vines, or architectural elements that whisper of forgotten mansions.
Start by painting your frames in deep blacks, midnight blues, or aged bronze. I learned this trick while working on a short horror film where we transformed cheap thrift store finds into museum-worthy pieces. Mix different sizes but keep the color palette cohesive—it’s like directing a scene where every element needs to work together.
Fill your frames with vintage botanical prints, old portraits with mysterious eyes, or even mirror pieces that reflect flickering candlelight. The key is creating layers of intrigue without cramming too much into your limited wall space. Less really can be more terrifying. Additionally, consider incorporating theme consistency to ensure your gallery wall complements the overall spooky vibe of your room.
Add Textural Elements Through Layered Fabrics and Throws
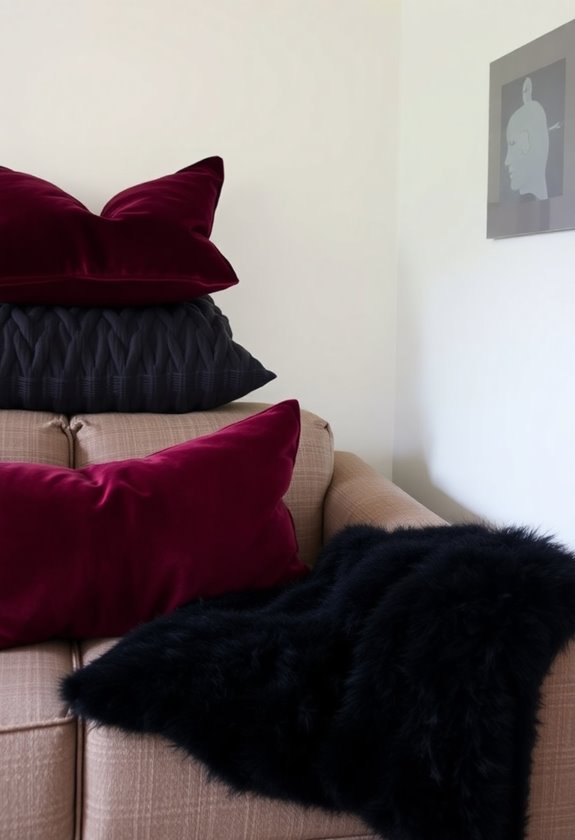
After you’ve mastered the visual drama of your gallery wall, it’s time to invite your guests’ hands to experience the fear—and that’s where layered fabrics become your secret weapon for creating an atmosphere that feels as unsettling as it looks.
I discovered this technique while decorating my first tiny apartment, where every texture had to pull double duty. You’ll want to focus on these spine-tingling combinations:
- Velvet cushions in deep burgundy or midnight black – they absorb light and create mysterious shadows
- Faux fur throws with uneven textures – nothing says “haunted mansion” like something that feels alive under your fingertips
- Lace curtains or table runners – they cast eerie patterns while adding Victorian elegance
Don’t match everything perfectly; the slight discord between textures creates that delicious unease you’re after. Layer different weights and weaves until your space whispers secrets through touch alone.
Incorporate Floating and Hanging Decorations to Save Floor Space
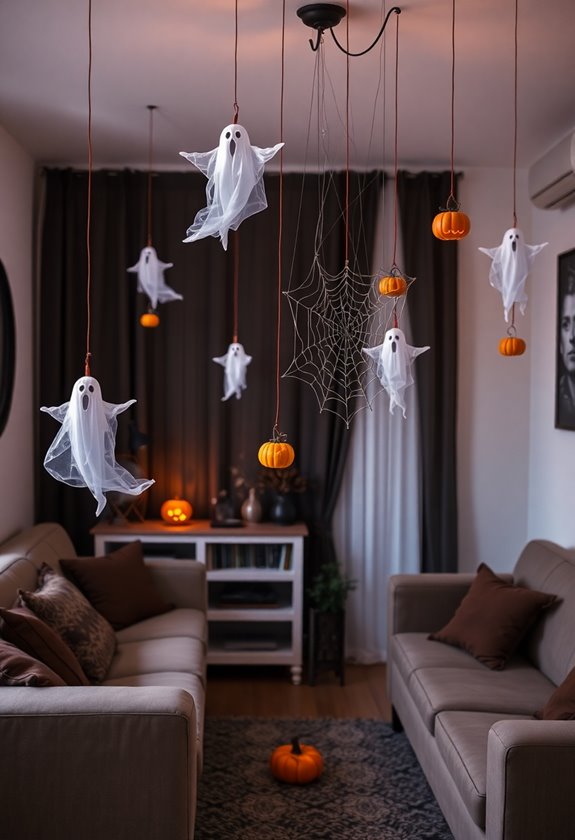
Three years ago, when I was trying to transform my cramped studio into a haunted haven, I learned that the secret isn’t covering every surface—it’s claiming the air itself.
You’ll discover that hanging decorations become your best friend in tight spaces. Start with lightweight paper bats suspended from fishing line—they’ll dance eerily whenever someone walks by. I’ve found that plastic spiders dangling at different heights create genuine jump scares, especially when positioned near doorways.
Don’t overlook your ceiling’s potential. Those plastic skeleton hands emerging from above? Pure genius for small rooms. You can also hang cheesecloth ghosts from curtain rods or light fixtures, letting them sway naturally.
My favorite trick involves creating floating potion bottles using clear thread and small LED tea lights inside. They cast mysterious shadows while taking up zero floor space. Remember, when you’re working with limited square footage, vertical decorating transforms your room into a three-dimensional haunted experience.
Frequently Asked Questions
How Much Should I Budget for Spooky Decorations in a Small Living Room?
You’ll want to budget around $30-60 for spooky decorations in your small living room. I’ve learned that dollar stores offer amazing fake spiders, cobwebs, and mini pumpkins for just a few bucks each. You can create dramatic impact with string lights ($8-12) and a few strategically placed plastic skeletons ($10-15). Don’t overspend – sometimes the simplest decorations, like homemade paper bats, create the most spine-tingling atmosphere without breaking your wallet.
What Spooky Scents Work Best for Creating Atmosphere in Small Spaces?
Your nose becomes the gateway to spine-tingling terror! I’ve discovered that cinnamon and clove candles work magic in cozy spaces—they’re warm yet mysterious. Pumpkin spice might seem obvious, but it’s genuinely effective. Here’s my secret: vanilla with a hint of smoky wood creates an unexpectedly eerie vibe. Avoid overpowering scents like heavy incense; they’ll suffocate your small room. I learned this the hard way during my first Halloween party!
How Do I Store Halloween Decorations in a Tiny Apartment Year-Round?
You’ll need creative storage solutions that maximize every inch. I’ve learned vacuum-sealed bags work wonders for fabric items like fake cobwebs and costume pieces. Under-bed storage boxes keep fragile decorations safe, while over-door organizers hold smaller items. My favorite trick? Clear stackable bins that fit in closets—you’ll actually see what’s inside next October. Label everything clearly, and consider storing seasonal items at friends’ places if you’re really tight on space.
Are There Pet-Safe Alternatives to Traditional Spooky Decorating Materials?
Like a guardian angel watching over your furry friends, you’ll want safe spooky alternatives that won’t harm them. I’ve learned the hard way that fake cobwebs can trap curious paws! Try fabric pumpkins instead of real ones, battery-operated candles rather than flames, and avoid small decorative pieces they might swallow. Paper bats, felt ghosts, and wooden signs create that eerie atmosphere you’re craving without risking your pet’s safety.
What’s the Best Timeline for Decorating and Removing Halloween Decor?
You’ll want to start decorating around mid-September, giving yourself plenty of time to gradually build that spooky atmosphere. I’ve learned the hard way that rushing leads to wonky spider webs and crooked pumpkins! Take down decorations by November 2nd—trust me, leaving fake cobwebs up until Thanksgiving just looks sad. Pack everything carefully in labeled bins so next year’s setup feels like reuniting with old friends rather than solving puzzles.