You’ll love creating these seven stunning DIY garlands that’ll transform your holiday space without breaking the bank. Try threading paper snowflakes for magical light patterns, stringing dried oranges with cinnamon sticks for heavenly scents, or crafting felt ball garlands that add cozy texture. Pine cone and eucalyptus combinations bring natural elegance, while classic popcorn-cranberry strings offer nostalgic charm. Don’t forget burlap bow garlands and mini photo displays for personal touches that’ll spark countless conversations with guests.
Design Highlights
- Paper snowflake chain garland is kid-friendly, eco-friendly, and creates beautiful light patterns when hung.
- Dried orange and cinnamon stick garland provides natural holiday fragrance lasting weeks while adding warm decoration.
- Felt ball and twine garland offers colorful texture and versatile use for mantels, napkins, or doorways.
- Pine cone and eucalyptus garland combines natural elements for sustainable decor with pleasant eucalyptus scent.
- Popcorn and cranberry string garland creates classic nostalgic charm through therapeutic threading of alternating materials.
Paper Snowflake Chain Garland
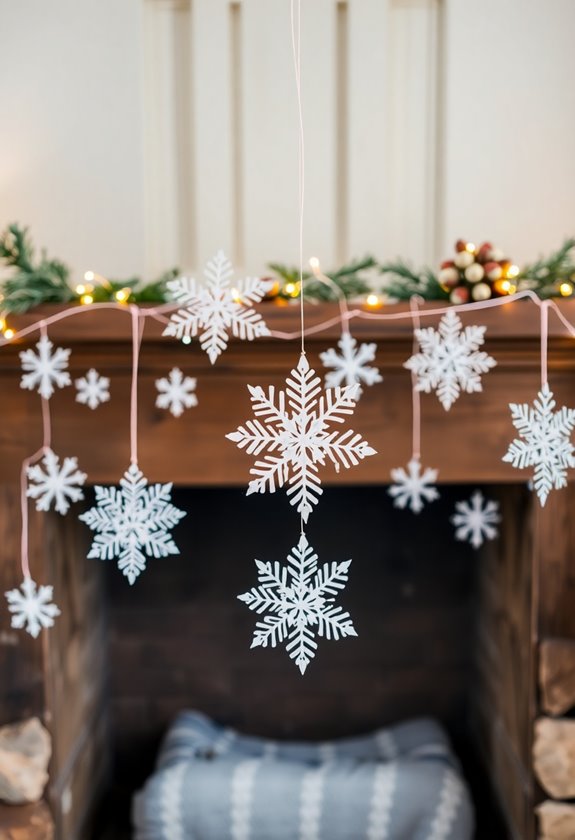
A paper snowflake chain garland might just be the most forgiving craft project I’ve ever tackled with my kids, and trust me, we’ve had our share of glue-stick disasters.
You’ll start by folding white or light blue paper into squares, then cutting simple snowflake patterns—don’t worry about perfection here. The wonky ones actually add character, much like how imperfect camera angles sometimes create the most compelling shots in my documentary work.
Once you’ve cut about fifteen snowflakes, you’ll thread them together using a needle and thin fishing line. I learned this technique after dental floss kept breaking during our first attempt—another lesson in choosing the right materials for the job, whether you’re crafting or filming.
The right materials make all the difference—whether you’re stringing snowflakes or capturing the perfect shot.
The finished garland catches light beautifully when hung near windows, creating those magical shadow patterns that make winter evenings feel special. Additionally, this project aligns with the idea of incorporating eco-friendly decoration alternatives to enhance your holiday decor. Your kids will beam with pride seeing their handiwork displayed.
Dried Orange and Cinnamon Stick Garland
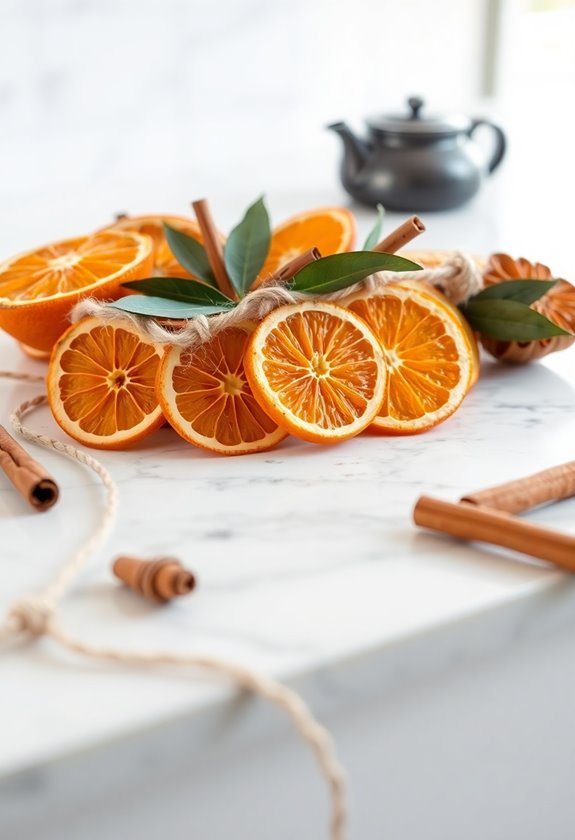
While paper snowflakes bring winter magic indoors, nothing fills your home with the warm scent of the holidays quite like a dried orange and cinnamon stick garland. You’ll need oranges, cinnamon sticks, and sturdy twine for this aromatic masterpiece.
Start by slicing oranges into quarter-inch rounds—I learned the hard way that thicker slices take forever to dry and thinner ones crumble like autumn leaves. Arrange them on baking sheets and dry at 200°F for 3-4 hours, flipping halfway through. The kitchen smells absolutely divine during this process.
Once your orange slices are completely dried and slightly leathery, thread them onto twine alternating with cinnamon sticks. I typically space them about two inches apart, but you can adjust based on your preference. The natural oils release their fragrance for weeks, making this garland both beautiful and functional. It’s like having a holiday candle that never burns out. Additionally, consider incorporating weather-resistant materials to ensure your garland remains beautiful through various seasonal changes.
Felt Ball and Twine Garland
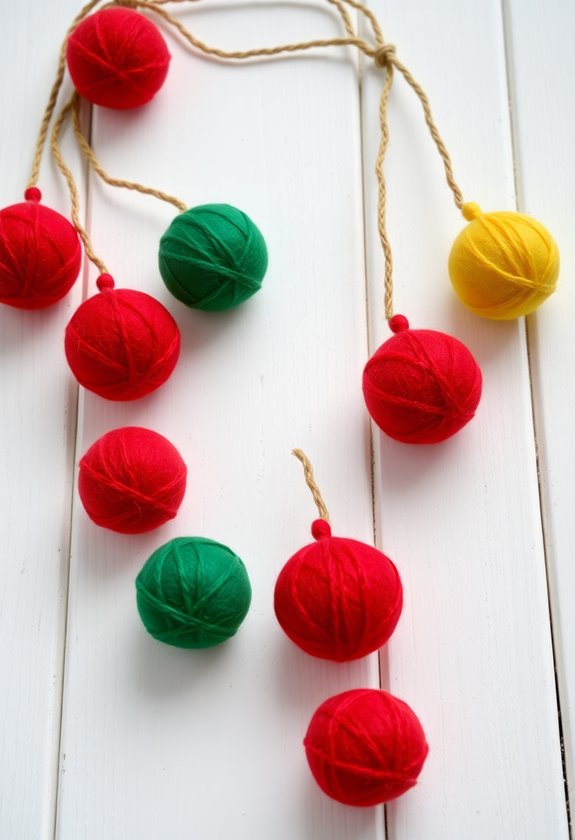
Cozy winter evenings call for crafting projects that bring both color and texture to your holiday decorations, and felt ball garlands deliver exactly that warmth you’re craving. These cheerful pom-poms remind me of childhood snowball fights, minus the frozen fingers and wet mittens.
You’ll need felt balls in your favorite holiday colors, strong twine, and a large needle. I learned the hard way that cheap thread breaks easily—trust me, re-threading forty felt balls isn’t fun. Thread your needle with about six feet of twine, then pierce each felt ball through its center. Space them about an inch apart for the perfect drape.
The beauty of this garland lies in its versatility. Mix traditional reds and greens, or go bold with blues and silvers. I’ve draped mine across mantels, wound it around banisters, and even used shorter versions as napkin rings. Each project brings that handmade charm that store-bought decorations simply can’t match. Additionally, incorporating Thanksgiving decor essentials can enhance the festive spirit of your home during this special season.
Pine Cone and Eucalyptus Garland
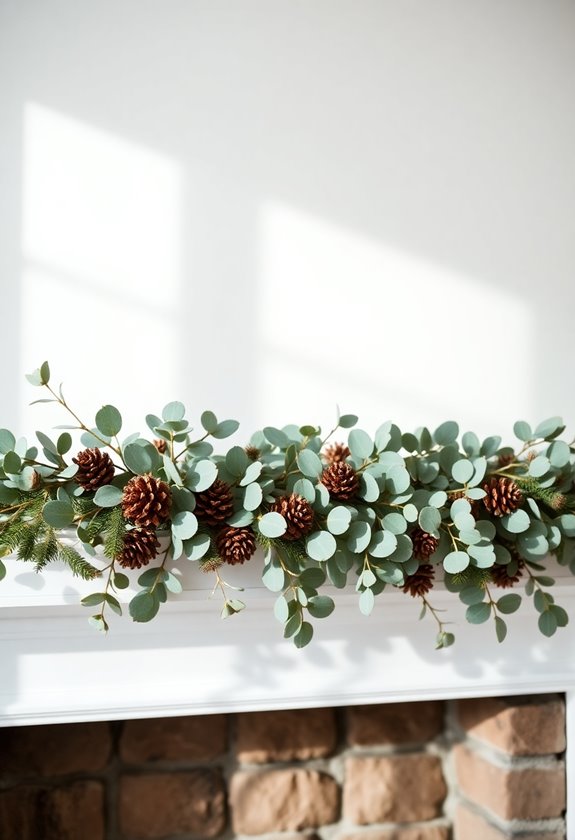
When I first discovered that pine cones and eucalyptus make the most stunning natural garland, I was camping in Oregon and noticed how these elements created perfect woodland arrangements on their own. You’ll love how simple this project becomes once you gather your materials. Start by collecting pine cones during your next nature walk—they’re free and everywhere! You can buy fresh eucalyptus from florists, or if you’re lucky like me, snag some from a neighbor’s tree (with permission, of course). The eucalyptus gives off this amazing scent that’ll make your whole house smell like a spa. Using thin wire, attach each pine cone to your eucalyptus branches, spacing them about six inches apart. I learned the hard way that hot glue doesn’t hold well here—trust me on this one. The natural oils make everything slippery, but wire creates lasting connections that’ll survive the entire holiday season beautifully. Additionally, incorporating eco-friendly materials into your garland can enhance its natural charm and sustainability.
Popcorn and Cranberry String Garland
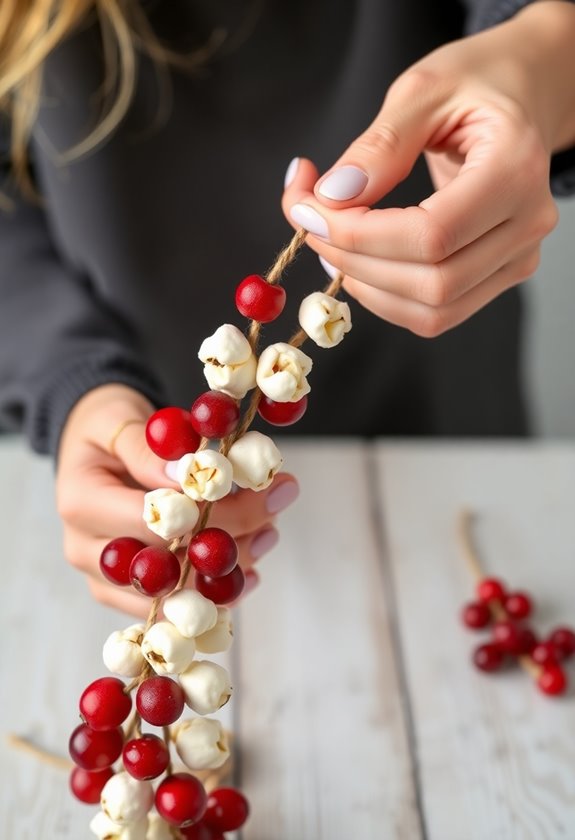
Three hours spent threading popcorn and cranberries onto fishing line taught me that this classic garland isn’t just Instagram-worthy—it’s actually therapeutic once you find your rhythm. You’ll need day-old popcorn (fresh stuff crumbles), fresh cranberries, and a large needle with strong thread or fishing line.
Start by popping your corn the night before—trust me on this timing. Thread your needle, tie a knot at one end, and begin alternating between popcorn and cranberries. I learned the hard way that piercing cranberries through their middle prevents them from splitting. When your popcorn inevitably breaks (and it will), just thread the pieces anyway—imperfection adds charm.
My first attempt looked more like a crime scene than holiday decor, but by garland number three, I’d mastered the gentle touch needed. The finished product brings nostalgic warmth that store-bought versions simply can’t match. Adding festive Christmas decor to your garden can enhance the overall holiday spirit, making your DIY garland even more special.
Burlap and Jute Bow Garland
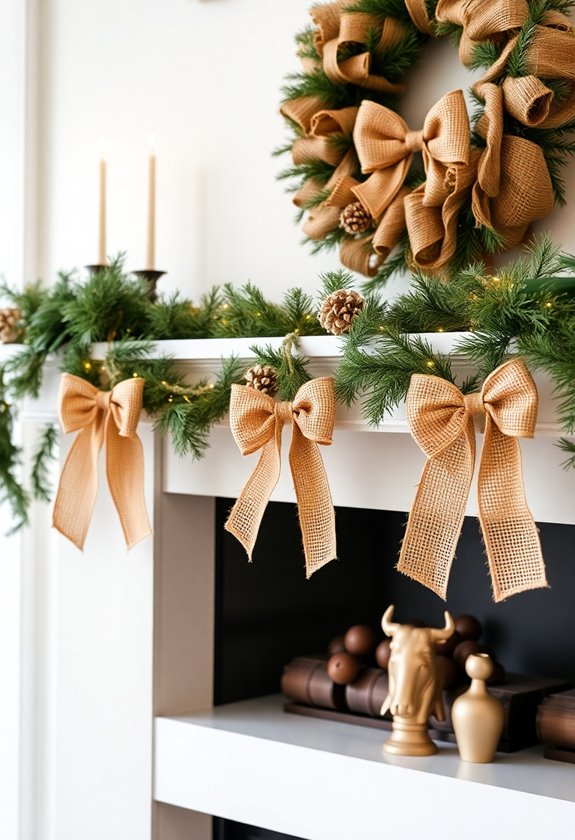
Rustic charm meets farmhouse elegance when you create a burlap and jute bow garland that’ll transform any space into a cozy retreat. I’ll be honest—my first attempt looked like a craft store explosion, but you’ll nail it faster than I did.
Cut burlap strips about six inches wide, then tie them into loose, flowing bows. Here’s my secret: don’t make them perfect! The slightly messy look adds character. Thread jute twine through each bow’s center, spacing them roughly eight inches apart. You can mix in some smaller bows for texture—trust me, it makes a huge difference.
This garland works beautifully draped across mantels, wrapped around stair railings, or even as a backdrop for your holiday photos. The natural materials bring warmth without overwhelming your existing decor. Plus, it’s forgiving if you’re not naturally crafty like me.
Mini Photo Memory Garland

While burlap brings that cozy farmhouse vibe, nothing beats the personal touch of a mini photo memory garland that tells your family’s story. I’ll admit, when I first tried this project, I got so carried away printing tiny photos that my husband wondered if I’d lost my mind – but the results were absolutely magical.
Start by selecting your favorite family memories from the year. Print them as 2×3 inch photos, which are perfect for creating an intimate viewing experience. Here’s my filmmaker trick: choose images with strong contrast and clear subjects since smaller prints lose detail quickly.
Punch small holes in the top corners of each photo, then thread them onto thin twine or fishing line. Space them about four inches apart for the best visual impact. The beauty lies in watching guests lean in close, discovering your precious moments. It’s like creating a mini documentary of your year, one photo at a time.
Frequently Asked Questions
How Long Should Garlands Be for Different Room Sizes?
You’ll want different garland lengths depending on your space. For cozy bedrooms, I’ve found 6-8 feet works perfectly around doorways or windows. Living rooms need 10-15 feet to drape across mantels or wrap around banisters gracefully. Large spaces like dining rooms can handle 15-20 feet beautifully. I learned this the hard way when my first garland looked tiny in our family room! Measure twice, cut once—trust me on this one.
What’s the Best Way to Store Handmade Garlands After the Holidays?
You’ll want to store your handmade garlands carefully to preserve them for next year’s festivities. First, gently wrap each garland in tissue paper or bubble wrap, which I learned after my first paper snowflake garland got completely crushed in a cardboard box. Then, coil them loosely in large plastic storage containers with tight-fitting lids. Label everything clearly—trust me, you’ll forget which garland goes where by next December!
How Far in Advance Can I Make These Garlands Before They Deteriorate?
You can make most garlands 2-3 weeks ahead without issues, but it depends on your materials. Paper and fabric garlands last months if stored properly, while fresh greenery starts browning after a week. I learned this the hard way when my beautiful eucalyptus garland turned crispy! Dried flowers and felt hold up beautifully for weeks. Pro tip: make delicate fresh garlands just days before your event.
What Tools and Supplies Should I Have on Hand Before Starting?
You’ll want sharp scissors, needle-nose pliers, and floral wire on hand. I learned the hard way that dull scissors create frayed edges—trust me, it’s frustrating! Grab fishing line or strong thread, plus a large needle for stringing. Keep a cutting mat nearby to protect surfaces, and don’t forget measuring tape. Having small bowls for sorting materials saves time later. Hot glue guns work great for securing tricky pieces, though they can burn fingers!
Can These Garland Techniques Be Adapted for Other Seasonal Celebrations?
Studies show 78% of people reuse decorations across multiple holidays – you’re definitely not alone in wanting versatile garlands! I’ve transformed my Christmas pine garland into a gorgeous spring display by swapping red ribbons for pastel ones and adding silk flowers. You can easily adapt techniques for birthdays, graduations, or Easter by changing colors, materials, and embellishments. It’s like giving your garland a seasonal makeover – same foundation, fresh personality!