You can create stunning Christmas wreaths by starting with a wire frame and layering fresh greenery like pine, fir, or cedar for that classic holiday scent. Secure everything with floral wire, then add decorative elements like pinecones, berries, and ribbon to match your style. I’ve learned that overlapping greenery pieces creates a fuller, more professional look, while spacing focal elements evenly prevents overcrowding. The key is choosing hardy materials that’ll last through January, and there’s so much more to discover about perfecting your technique.
Design Highlights
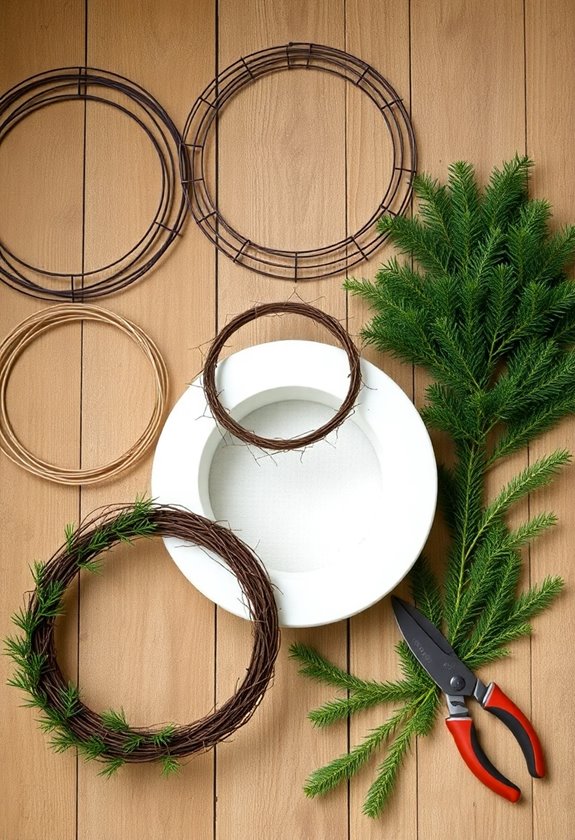
- Start with a sturdy wire frame, foam ring, or grapevine base to provide proper foundation for your wreath.
- Secure greenery like pine, fir, or cedar with floral wire, overlapping pieces for a full, lush appearance.
- Add decorative elements such as pinecones, berries, and ornaments, spacing them evenly for balanced visual appeal.
- Choose cohesive color schemes like monochromatic tones, jewel tones, or winter whites to create stunning visual impact.
- Preserve fresh greenery by misting every other day and keeping away from direct heat sources for longevity.
Essential Materials and Tools for Wreath Making

When I first attempted to make a Christmas wreath three years ago, I thought I could wing it with just some pine branches and ribbon—boy, was I wrong! You’ll need more supplies than you might expect, but don’t worry, most are affordable and reusable.
Making a Christmas wreath requires way more supplies than just pine branches and ribbon—learn from my rookie mistake!
Start with a sturdy base like a wire frame or foam ring. You’ll want floral wire for securing everything—trust me, hot glue alone won’t cut it when Uncle Bob accidentally bumps your masterpiece. Grab wire cutters, which make trimming so much easier than struggling with kitchen scissors.
For greenery, mix different textures: pine, fir, cedar, or eucalyptus create beautiful contrast. Add berries, pinecones, or ornaments for pizzazz. Don’t forget ribbon for that perfect bow! Additionally, you can enhance your wreath with festive kitchen decor ideas that complement your holiday theme.
Pro tip: work gloves save your hands from scratches, and newspaper protects your workspace. With these essentials, you’re ready to create something truly special.
Choosing the Perfect Base for Your Christmas Wreath
Now that you’ve gathered your supplies, let’s talk about the foundation that’ll make or break your wreath—the base. Think of it like choosing the right canvas for a painting; it sets everything up for success or disaster.
Wire frames are your trusty workhorses—lightweight, affordable, and forgiving for beginners. I’ve saved countless wreaths using these simple circles when my ambitious grapevine attempts went sideways. Grapevine bases bring natural charm but can be stubborn; their irregular shapes sometimes fight your vision like a temperamental actor on set.
Foam bases work beautifully for dried flowers and lightweight decorations, though they’ll crumble if you get too aggressive with heavy ornaments. Straw bases offer that rustic appeal but shed everywhere—trust me, you’ll find pieces in January.
Consider your decorating style and weight requirements. Heavy ornaments need sturdy wire or thick grapevine, while delicate dried flowers thrive on gentler foam foundations. Additionally, using festive Christmas decor can elevate your wreath and enhance your garden’s holiday spirit.
Gathering Natural Elements From Your Yard and Neighborhood

Three steps out your front door, and you’re already standing in a goldmine of wreath-making treasures. I’ve learned that nature provides the most stunning decorations, and they’re completely free! You’ll discover materials that store-bought versions can’t match.
Start your hunt early in the season when elements are fresh and vibrant. I’ve made the mistake of waiting too long – trust me, wilted leaves don’t photograph well in family Christmas cards!
Here’s what you should gather:
- Evergreen branches from pine, fir, or cedar trees
- Colorful berries like holly, winterberry, or rose hips
- Interesting seed pods from magnolias, sweet gum, or maple trees
- Textured foliage such as eucalyptus, lamb’s ear, or ivy
Ask neighbors before clipping from their yards – most people happily share. I’ve discovered some of my best wreath elements came from friendly conversations over garden fences. Additionally, consider incorporating decorative elements and patterns to enhance the overall aesthetic of your wreath.
Step-by-Step Assembly Techniques for Beginners

Armed with your freshly gathered treasures, you’re ready to transform them into something magical – but I’ll be honest, my first wreath looked like a bird’s nest that had been through a windstorm! Don’t worry though; with these simple steps, you’ll create something beautiful.
Start with your wire frame on a flat surface. Begin attaching your base greenery – pine branches work perfectly – by securing them to the frame with floral wire. Overlap each piece about halfway, moving in one direction around the circle. This creates that full, lush look you’re after.
Next, add your focal elements like pinecones or berries, spacing them evenly around the wreath. Use hot glue or wire to secure heavier items. Finally, weave in your ribbon, leaving enough length for hanging. Additionally, consider incorporating weather-resistant decorations to ensure your wreath withstands the elements throughout the holiday season.
Creative Color Schemes and Design Themes
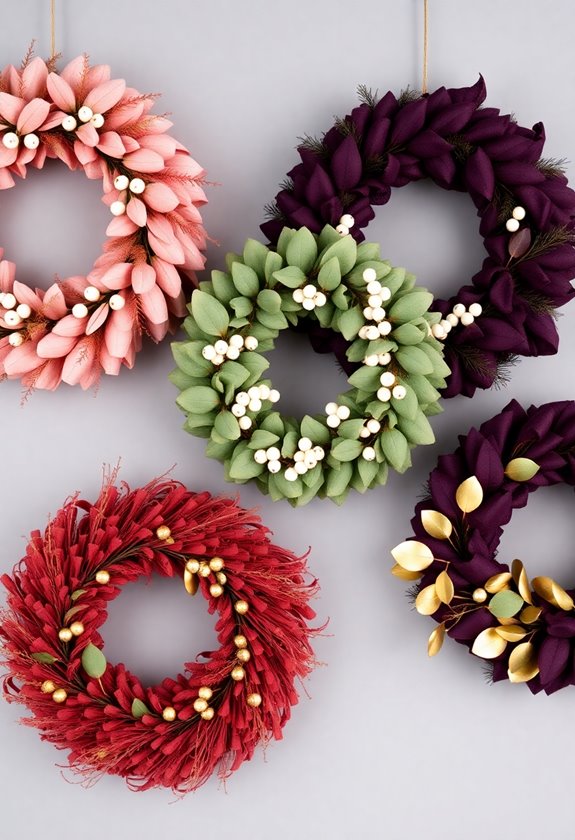
While traditional red and green combinations never go out of style, you’ll discover that experimenting with unexpected color palettes can transform your wreath from ordinary to absolutely stunning.
Last December, I created a silver and ice-blue wreath that had my neighbors stopping mid-stride. The secret? I’d learned that color tells your wreath’s story before anyone notices the details.
Here are four creative approaches I’ve perfected through years of happy mistakes:
- Monochromatic Magic – Choose varying shades of one color, like deep burgundy to pale pink
- Nature’s Neutrals – Combine cream, taupe, and soft browns with natural textures
- Jewel Tone Drama – Mix rich purples, emerald greens, and golden yellows for sophistication
- Winter Wonderland – Blend whites, silvers, and pale blues with metallic accents. Additionally, consider incorporating shimmering elements to enhance the visual appeal of your wreath.
Adding Ribbons, Bows, and Fabric Accents

The moment you add ribbons and fabric accents, your wreath transforms from a simple decoration into a masterpiece that speaks your personal style. I learned this lesson when my first attempt looked embarrassingly bare—like a green donut hanging on my door.
Adding ribbons and fabric accents transforms your wreath from a bare green donut into a personal style masterpiece.
Start with wired ribbon since it holds its shape beautifully. Cut generous lengths, about three times your desired bow size. Create classic loops by pinching the center and securing with floral wire. Don’t worry if it’s messy; imperfection adds character.
Layer different textures for visual interest. Combine velvet with burlap, or add sparkly mesh over solid colors. Weave thin ribbon through branches, creating gentle curves that catch the light.
For fabric accents, consider plaid strips or lace remnants. Simply tie them loosely around sections of your wreath. The key is balance—step back frequently to assess your work. Trust me, it’s easier to remove excess than to fix a cluttered mess later.
Incorporating Ornaments and Decorative Elements

Once you’ve mastered ribbons and bows, ornaments become your secret weapon for creating depth and personality in your wreath. I learned this lesson the hard way when my first attempt looked disappointingly flat – like a Christmas pancake hanging on my door!
The key is layering different textures and sizes strategically. Start with larger statement pieces, then fill gaps with smaller accents. Here’s my go-to approach:
- Ball ornaments in varying sizes create visual weight and shine
- Natural elements like pinecones, berries, or dried orange slices add organic texture
- Miniature figurines or themed decorations tell your wreath’s story
- Metallic accents like bells or stars catch light beautifully
Don’t overcrowd – negative space lets each element breathe. I typically use the “triangle rule,” placing three similar items in different spots to create balance. Remember, you’re not decorating a tree; you’re crafting a welcoming focal point that reflects your holiday spirit.
Preserving Fresh Greenery for Long-Lasting Beauty

After spending countless December mornings sweeping dried needles from my doorstep, I discovered that fresh greenery doesn’t have to become a brittle mess within days. You can keep your wreath looking gorgeous well into January with a few simple tricks I’ve learned through trial and error.
First, mist your wreath every other day with a spray bottle – think of it as giving your greenery a revitalizing drink. I’ve found that early morning works best, allowing the water to absorb before evening temperatures drop.
Next, keep your wreath away from direct heat sources like furnace vents or sunny windows. These dry out your beautiful branches faster than you’d expect. I learned this lesson after my first wreath turned brown within a week!
Finally, choose hardy varieties like pine, fir, or cedar. They’re naturally more resilient than delicate options and will reward your efforts with lasting beauty.
Alternative Materials for Non-Traditional Wreaths

While traditional evergreen wreaths hold timeless charm, you’ll discover a whole world of creative possibilities when you venture beyond pine and fir. I’ve learned through countless crafting adventures that unconventional materials often create the most memorable pieces.
You can transform everyday items into stunning holiday displays with these alternatives:
- Dried eucalyptus and lavender – Creates an aromatic, silvery-green base that lasts months
- Grapevine branches – Provides rustic texture that’s perfect for farmhouse-style decorating
- Fabric strips and burlap – Offers endless color combinations while being budget-friendly
- Paper flowers and book pages – Ideal for apartment dwellers who want fire-safe options
When I first tried making a fabric wreath, I worried it wouldn’t feel “Christmas-y” enough. However, guests consistently complimented its unique warmth. These non-traditional materials let you match your home’s existing décor while expressing your personal style—something store-bought wreaths simply can’t achieve.
Display Ideas and Hanging Methods for Maximum Impact
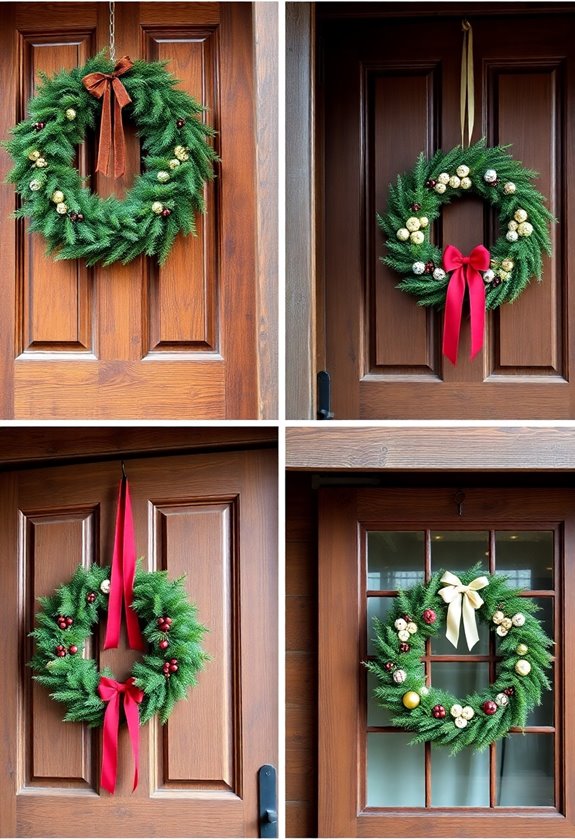
Creating a beautiful handmade wreath is only half the battle—displaying it properly can make the difference between a decoration that gets noticed and one that truly captivates your visitors.
I learned this lesson when my first wreath disappeared against my dark front door. Now, I always consider contrast and lighting. Light-colored wreaths pop against dark surfaces, while darker wreaths shine on white or cream doors.
For hanging, skip those flimsy over-the-door hooks—they’ll leave you frustrated when your wreath crashes down. Instead, use a sturdy wreath hanger or install a small nail above your door frame. Command strips work wonderfully for apartment dwellers who can’t make holes.
Don’t limit yourself to doors! I’ve hung wreaths on mirrors, above mantels, and even suspended them from ceiling beams with fishing line. Layer different sizes for drama, or add battery-operated lights for evening magic.
Frequently Asked Questions
How Much Does It Typically Cost to Make a Handmade Christmas Wreath?
Money doesn’t grow on trees, but you’ll find making wreaths won’t break the bank! You can create a beautiful wreath for $15-30, depending on your materials. I’ve made stunning ones using free branches from my yard, plus $10 worth of ribbon and ornaments. Store-bought bases cost $5-15, while fresh greenery runs $10-20. You’ll save money compared to buying finished wreaths, plus you’ll have that satisfying “I made this!” feeling.
How Long Does It Take to Complete a Wreath From Start to Finish?
You’ll typically spend 2-3 hours crafting your first wreath, though I’ve watched beginners take up to 4 hours when they’re really perfectionist about it. Once you’ve made a few, you can whip one up in about an hour. The wire base takes 15 minutes, gathering greenery another 30, and the fun decorating part fills the rest. Don’t rush it—that’s where the magic happens, trust me.
Can Children Safely Participate in Making Christmas Wreaths?
Like little elves in Santa’s workshop, children can absolutely join the wreath-making magic! I’ve watched my own kids transform from fumbling apprentices to confident crafters. You’ll want to handle the wire work and sharp tools yourself, but they’ll love gathering pinecones, choosing ribbon colors, and placing ornaments. It’s honestly one of my favorite holiday traditions – their excitement is contagious, and you’re creating memories that’ll last forever.
What’s the Best Time of Year to Start Making Christmas Wreaths?
You’ll want to start making your Christmas wreaths in late November, trust me on this one. I learned the hard way that waiting until mid-December creates unnecessary stress – like trying to film a movie scene while the sun’s setting! Fresh greenery lasts about three to four weeks, so timing’s essential. Start too early, and your beautiful creation wilts before Christmas morning. Late November gives you that perfect sweet spot for lasting beauty.
Do I Need Artistic Experience to Create a Beautiful Christmas Wreath?
You don’t need any artistic experience to create stunning wreaths! I remember my first attempt—I was terrified I’d mess up, but it turned out beautifully. Start with simple greenery like pine or fir, add basic ribbon, and you’re golden. The key is patience and willingness to experiment. Even if you’ve never crafted before, your hands will naturally find balance and beauty. Trust yourself—wreath-making is forgiving and incredibly rewarding.