You can create stunning Christmas decorations without breaking the bank by transforming everyday household items into festive masterpieces. Turn old newspapers into delicate snowflakes, craft luminaries from mason jars and battery lights, and gather pinecones from your backyard for beautiful centerpieces. I’ve discovered that salt dough ornaments become treasured keepsakes, while empty wine bottles transform into magical village displays. These simple projects prove that creativity trumps expensive store-bought decorations every time, and there’s so much more you can accomplish.
Design Highlights
- Create paper snowflakes and garlands from old newspapers and magazines for eco-friendly, cost-effective window and wall decorations.
- Make mason jar luminaries with battery-operated string lights, twine, and natural elements for under five dollars each.
- Gather free pinecones and twigs from your yard to create elegant centerpieces enhanced with fairy lights.
- Craft salt dough ornaments using flour, salt, and water, then personalize with paint and glitter for lasting keepsakes.
- Transform cardboard delivery boxes into stacked Christmas trees decorated with natural materials like pinecones and berries.
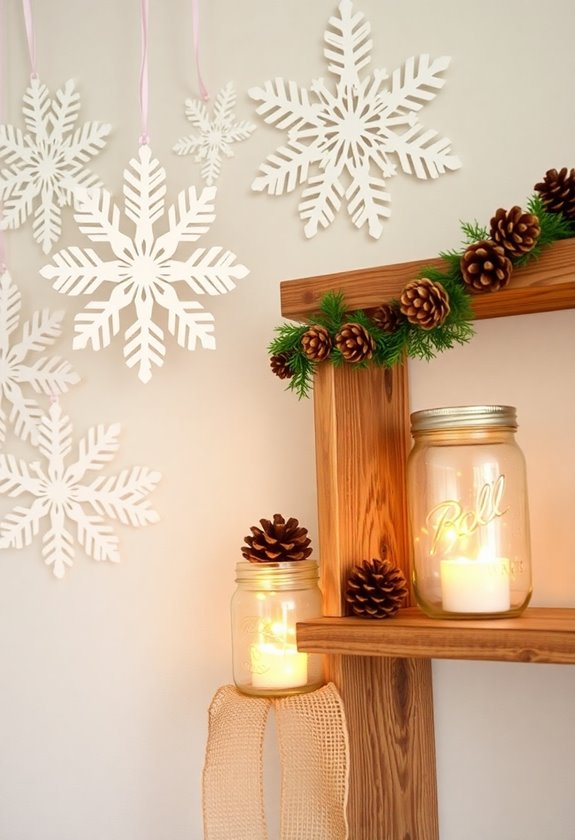
Paper Snowflakes and Garlands Using Newspaper and Magazine Pages
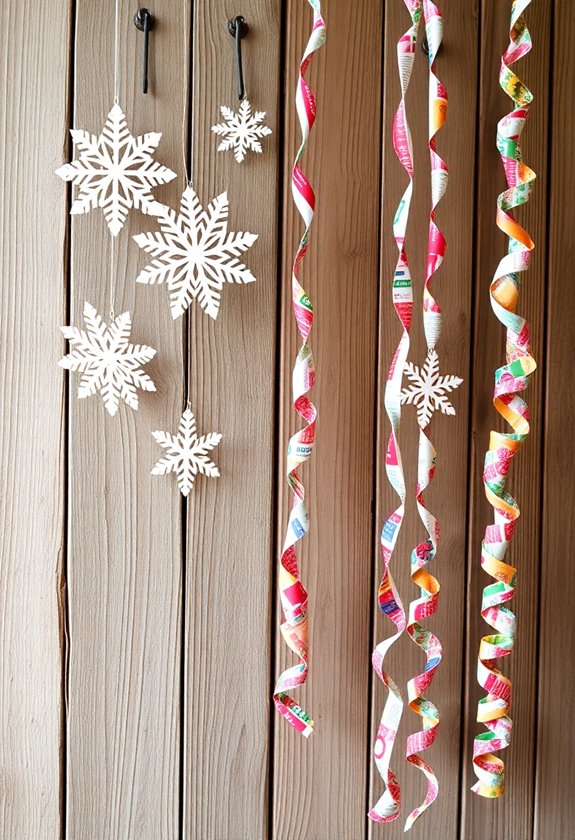
When I first started making Christmas decorations as a kid, I thought you needed fancy craft paper and expensive supplies to create something beautiful. Boy, was I wrong! Those old newspapers and colorful magazine pages sitting in your recycling bin are actually treasure troves for stunning holiday decor.
You’ll transform these forgotten pages into delicate snowflakes by folding them accordion-style, then cutting intricate patterns with scissors. I’ve spent countless winter afternoons perfecting my technique, and trust me, each snowflake becomes a tiny masterpiece. The best part? Magazine pages create surprisingly vibrant results – those glossy reds and greens make your snowflakes pop against windows.
For garlands, you’ll cut strips from newspaper comics or magazine photos, then link them together. I remember my first attempt looked wonky, but that imperfection gave it character. Your guests won’t believe these gorgeous decorations came from yesterday’s headlines! Plus, using eco-friendly decoration alternatives like these not only saves money but also promotes sustainability during the holiday season.
Mason Jar Luminaries With Battery-Operated String Lights
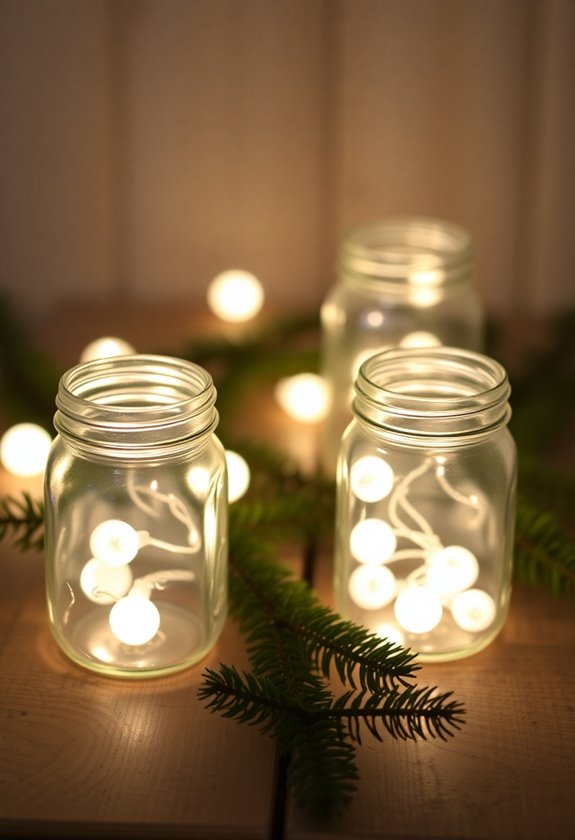
Magic happens the moment you drop those tiny LED lights into a simple mason jar, watching it transform into a warm, glowing beacon that’ll make your entire room feel like a winter wonderland. You’ll absolutely love how easy this project is – I learned this trick during my first apartment Christmas, when money was tight but my holiday spirit wasn’t.
Start with clean mason jars in any size you’ve got lying around. Battery-operated string lights work best because there’s no cord to wrestle with, and honestly, they’re safer too. Simply coil the lights inside, leaving the battery pack hanging outside the rim. I like to wrap some twine around the jar’s neck to hide the wires – it adds that rustic charm we’re all after. For extra magic, add fake snow or cranberries inside before the lights. You’ll create stunning centerpieces that cost under five dollars each. Additionally, consider incorporating festive kitchen island decor ideas to enhance your holiday theme throughout your home.
Pinecone and Twig Centerpieces From Your Backyard
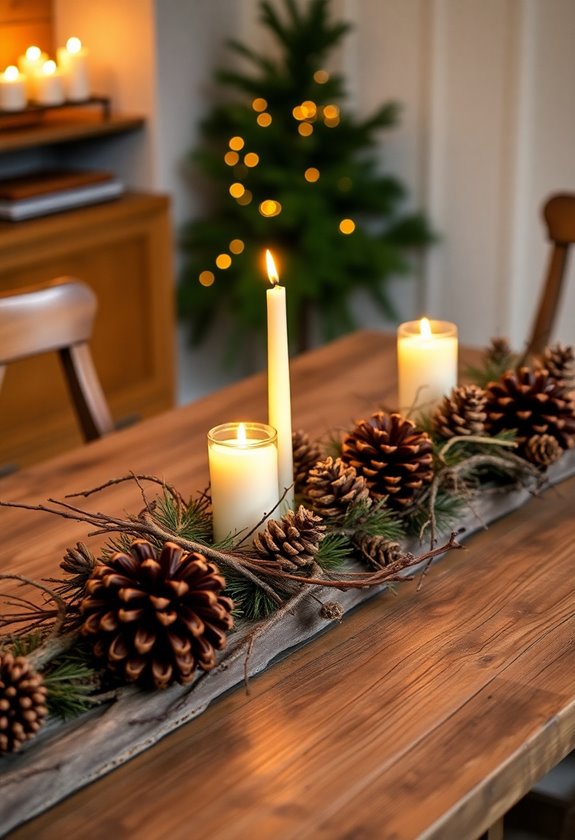
Three simple trips to your backyard can provide everything you need for gorgeous, cost-free centerpieces that’ll have your guests asking where you bought them. During my first attempt, I grabbed pinecones haphazardly and wondered why my arrangement looked like woodland chaos. Here’s what I learned: choose pinecones of varying sizes, then soak them in warm, soapy water for twenty minutes to remove debris and bugs.
For twigs, select branches with interesting curves or small offshoots—these add visual drama. I’ve discovered that birch twigs work beautifully because of their natural white bark, while oak branches provide sturdy structure. Arrange your largest pinecones first as anchor points, then weave twigs between them to create height and movement.
The magic happens when you add battery-operated fairy lights threaded through the arrangement. Suddenly, your free backyard finds become elegant focal points that rival expensive store-bought decorations. You can also enhance the atmosphere with festive Christmas decor to complement your DIY creations.
Handmade Salt Dough Ornaments for the Christmas Tree
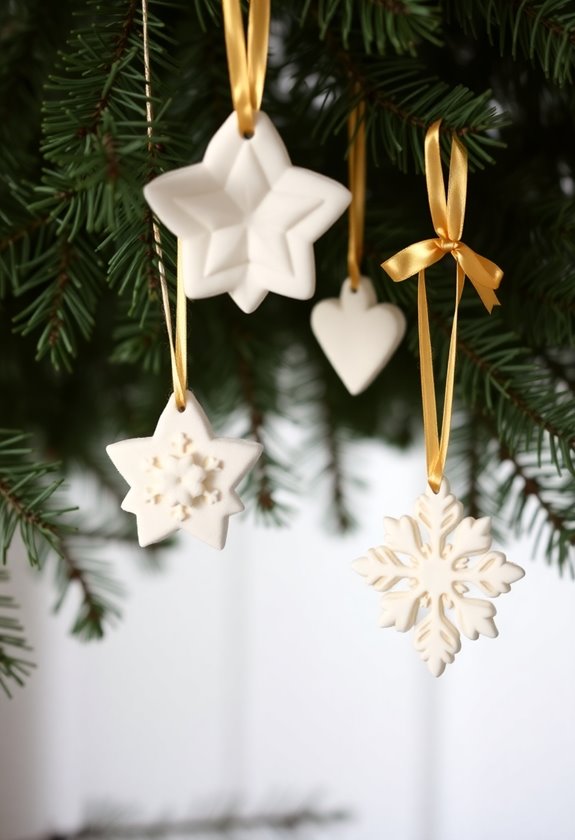
Nostalgia floods back every time I roll out salt dough, remembering how my grandmother’s kitchen smelled like flour and anticipation during December afternoons. You’ll love how simple these ornaments are to make with your family.
Mix one cup flour, half a cup salt, and half a cup water until you’ve got smooth dough. Roll it out like you’re making cookies, then use cookie cutters or trace around cups for perfect circles. Don’t forget to poke holes at the top with a straw before baking!
Bake at 200°F for two to three hours until they’re completely dry. Here’s where the magic happens: you can paint them with acrylics, add glitter, or let the kids go wild with markers. I’ve made mistakes—like forgetting the holes and having to drill them later. Thread ribbon through, and you’ve created treasures that’ll hang on your tree for years.
These ornaments can also be a delightful addition to your Christmas attic decor, bringing a personal touch to your holiday decorations.
Repurposed Wine Bottle Christmas Village Display
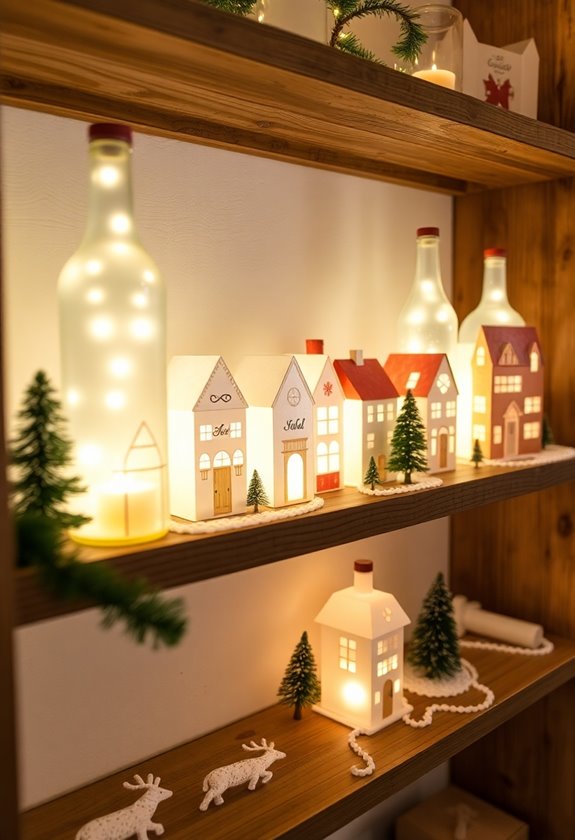
Those empty wine bottles stacking up in your recycling bin can transform into the most enchanting Christmas village you’ve ever seen, and I discovered this completely by accident after a particularly festive dinner party left me with six green bottles I couldn’t bear to throw away.
You’ll start by cutting each bottle’s bottom off—trust me, use a glass cutter for safety. Next, paint the bottles white or silver, creating a frosted winter effect. Once they’re dry, place battery-operated LED string lights inside each bottle. The magic happens when you arrange them on a dark cloth or mirror, creating your miniature village.
I like adding tiny paper houses, foam trees, and artificial snow around the bottles. The warm glow creates such a cozy atmosphere that guests always ask how I made it. Best part? You’re recycling while creating something absolutely stunning for pennies. Additionally, using high-quality materials ensures your decorations will last for years to come.
Fabric Scrap Wreaths Using Old Clothing and Linens
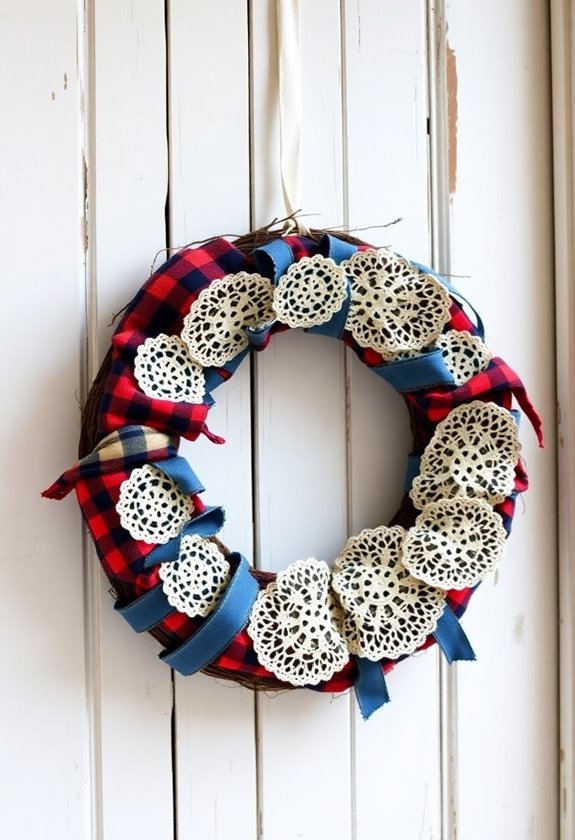
While glass bottles create magical lighting effects, fabric scraps from your closet can work equally stunning magic when transformed into wreaths that tell your family’s story. You’ll discover treasures hiding in forgotten corners—dad’s old flannel shirt, grandma’s vintage tablecloth, or your daughter’s outgrown dress.
Start with a foam wreath base from the dollar store. Cut fabric into strips roughly two inches wide and four inches long. Here’s where the fun begins: tie each strip around the wreath form, mixing textures and colors that speak to your heart. I’ve learned that plaid flannel pairs beautifully with lace doilies, creating unexpected harmony.
Don’t worry about perfection—wonky knots add character! My first attempt looked like a fabric tornado hit it, but guests couldn’t stop touching its cozy texture. Layer different fabrics until the foam disappears completely. You’ve just created a wreath that holds memories while welcoming visitors with warmth.
Coffee Filter Angel Decorations for Windows and Mantels
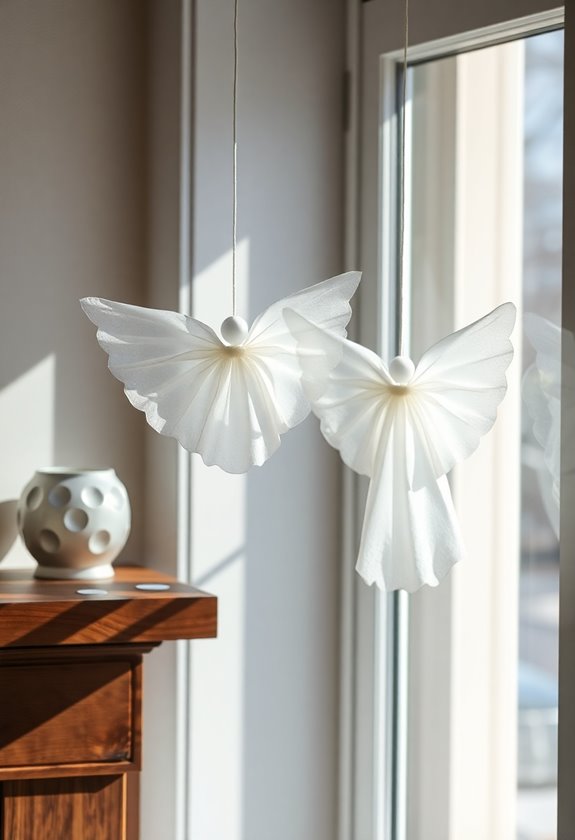
When your morning coffee ritual produces delicate paper filters, you’re looking at the foundation for ethereal angels that’ll transform any windowsill into a heavenly display. I discovered this accidentally when my daughter knocked over my craft supplies, scattering coffee filters everywhere—suddenly, they looked like perfect angel wings.
You’ll need coffee filters, wooden clothespins, markers or watercolors, and thin wire. Flatten three filters and fan them out like accordion pleats. The clothespin becomes your angel’s body—just clip it onto the center filter. Paint soft pastels across the “wings” for a stained-glass effect, letting colors bleed naturally.
For heads, roll a small filter ball and secure with wire. I’ve learned that slightly crumpled filters catch light beautifully, creating shadows that dance on walls. Hang them at varying heights in windows, or line your mantel for a choir of gentle guardians watching over your holiday celebrations.
Cardboard Box Christmas Trees With Natural Decorations
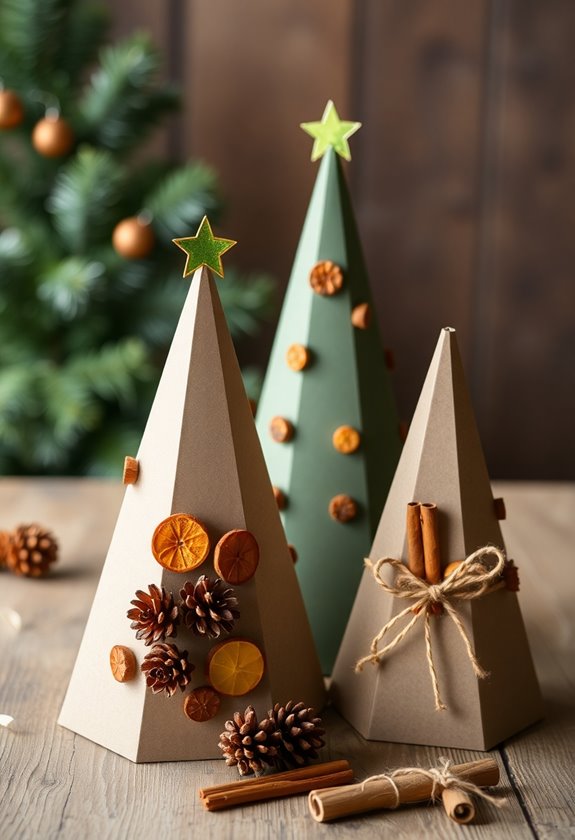
Moving from delicate angels to something more substantial, cardboard boxes scattered around your house after holiday deliveries aren’t just recycling—they’re perfect raw material for creating stunning miniature Christmas trees that’ll cost you practically nothing.
I’ll be honest, my first attempt looked like a cardboard disaster, but once you get the hang of cutting triangular tree shapes, you’ll be amazed at how charming these become. Cut your boxes into graduated triangular sections, stack them from largest to smallest, and secure with hot glue.
Here’s where the magic happens: head outside and gather pinecones, small twigs, dried berries, or even acorns. Hot glue these natural treasures onto your cardboard trees, creating texture that rivals expensive store-bought decorations. I love clustering three different-sized trees together on my mantel—they create this wonderful woodland scene that guests always ask about.
Cinnamon Stick and Orange Peel Aromatic Holiday Bundles

Since nothing beats the warm, spicy scents that instantly transform your home into a holiday haven, these aromatic bundles will become your secret weapon for creating that cozy Christmas atmosphere everyone craves.
You’ll need cinnamon sticks, dried orange peels, twine, and maybe some star anise for extra magic. I learned this trick after my first apartment Christmas disaster – nothing smelled festive, just like leftover pizza. These bundles saved my holiday spirit!
Start by gathering 3-4 cinnamon sticks and tying them together with natural twine. Tuck dried orange peels between the sticks, securing everything snugly. The key is drying your orange peels completely first – trust me, soggy peels aren’t aromatic, they’re just sad.
Hang these beauties on doorknobs, mantels, or your Christmas tree. They’ll release heavenly scents for weeks, and guests will think you’re some kind of holiday wizard. Plus, they cost practically nothing!
Frequently Asked Questions
How Much Should I Budget for Affordable DIY Christmas Decorations?
You’re probably wondering… what’s the magic number? Here’s the thing—you don’t need much! I’ve created stunning holiday displays for just $20-50. Start with $30 as your sweet spot. You’ll grab basics like paper, ribbon, pinecones, and Mason jars. Trust me, I’ve transformed my entire living room using dollar store finds and nature’s freebies. The secret isn’t spending more—it’s being creative with less. Your wallet will thank you later!
What Basic Crafting Tools Do I Need for These Projects?
You’ll need scissors, glue sticks, and craft knife for most projects. I always keep construction paper, felt, and ribbon handy—they’re lifesavers! A hot glue gun transforms everything, though I’ve burned my fingers countless times (trust me, use those finger guards). Markers, paintbrushes, and acrylic paints add beautiful details. Don’t forget measuring tape and pencils for planning. These basic tools cover 90% of projects, and you probably own half already!
How Far in Advance Should I Start Making Decorations?
You’ll want to start crafting six weeks before Christmas, trust me on this one! I learned the hard way when I rushed through ornament-making last December, ending up with glue-gunned fingers and crooked garlands. Begin with time-intensive projects like paper snowflakes and fabric wreaths in early November. Save quick wins like mason jar luminaries for later. This timeline lets you enjoy the process instead of stressing, plus you can fix any crafting disasters.
Are These DIY Decorations Safe Around Pets and Small Children?
You’ll want to carefully consider each decoration’s safety before displaying them. I’ve learned the hard way that glitter crafts become pet magnets, and small ornament pieces can be choking hazards. Choose non-toxic materials, secure loose parts, and position delicate items out of reach. Paper snowflakes and fabric garlands work wonderfully, while avoiding anything with tiny beads or sharp edges that curious hands might grab.
How Do I Store Homemade Decorations to Reuse Next Year?
Storing your handmade treasures is like tucking memories into a time capsule! I’ve learned the hard way that plastic bins with tight lids work wonders. Wrap delicate pieces in tissue paper, and I always snap photos before packing so I remember what’s inside. Label everything clearly—trust me, you’ll thank yourself next December! Keep bins in cool, dry spots away from temperature swings. Your future self will appreciate this thoughtful preparation immensely.