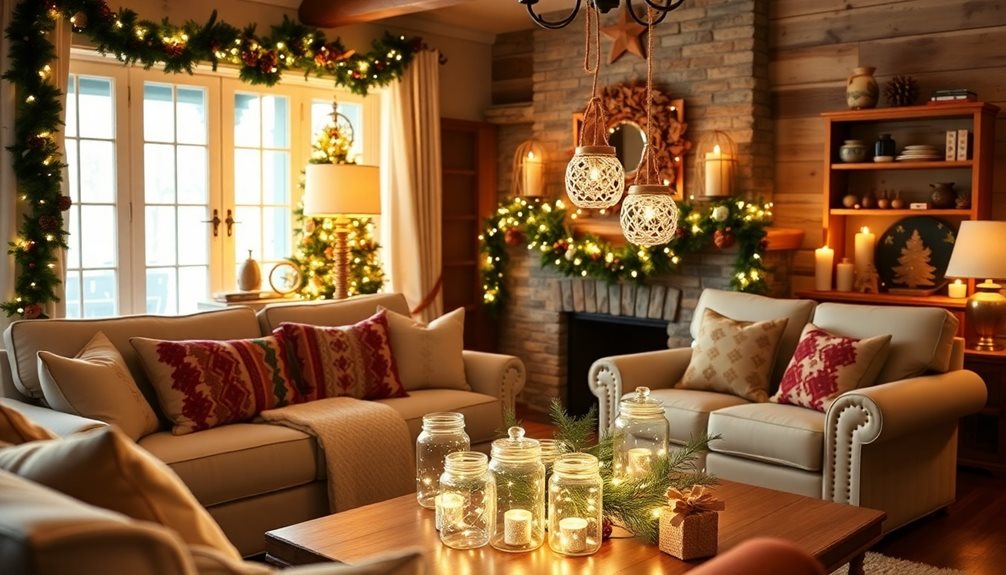
Transform your home into a magical Christmas wonderland with five budget-friendly DIY decorations you can make today. Create charming pinecone ornaments with festive ribbons, craft enchanting Mason jar snow globes, design delicate paper snowflakes for windows, wrap cinnamon sticks into cozy candle holders, and shape salt dough into personalized gift tags and ornaments. These simple yet stunning projects use everyday materials you might already have, making holiday decorating both meaningful and affordable. Let’s explore each creative project in detail.
Design Highlights
- Create natural pinecone ornaments by adding ribbons and optional glitter, using materials easily found outdoors and basic craft supplies.
- Transform Mason jars into enchanting snow globes with water, glycerin, and miniature Christmas figures for instant holiday magic.
- Cut intricate paper snowflakes from white paper squares to create elegant window decorations at virtually no cost.
- Wrap cinnamon sticks around glass votives to make aromatic candle holders using simple household materials and natural elements.
- Craft salt dough ornaments and gift tags using just flour, salt, and water, then personalize with paint and decorations.
Natural Pinecone Ornaments With Festive Ribbon
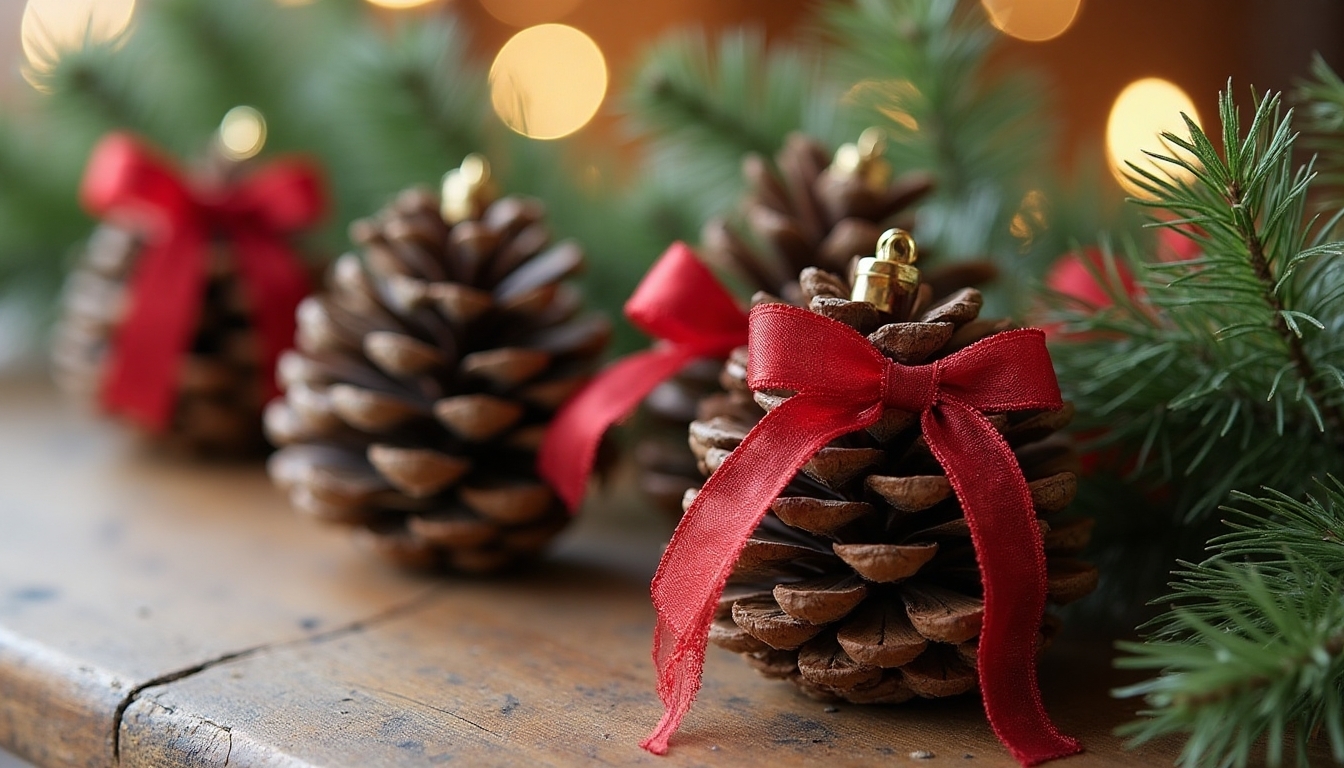
While store-bought ornaments sparkle with manufactured perfection, there’s something magical about crafting your own decorations from nature’s bounty. You’ll love how these pinecone ornaments bring a touch of woodland charm to your Christmas tree.
Begin by gathering fresh pinecones from your backyard or local park. After cleaning them gently with warm water, let them dry completely. Choose festive ribbon in traditional holiday colors like red, green, or gold. Loop the ribbon through the top scales of your pinecone, creating a secure knot. For extra sparkle, you can dust the tips with glitter or add a light spray of metallic paint. Additionally, consider incorporating durable, high-quality materials to ensure your ornaments last through many holiday seasons.
Mason Jar Snow Globes
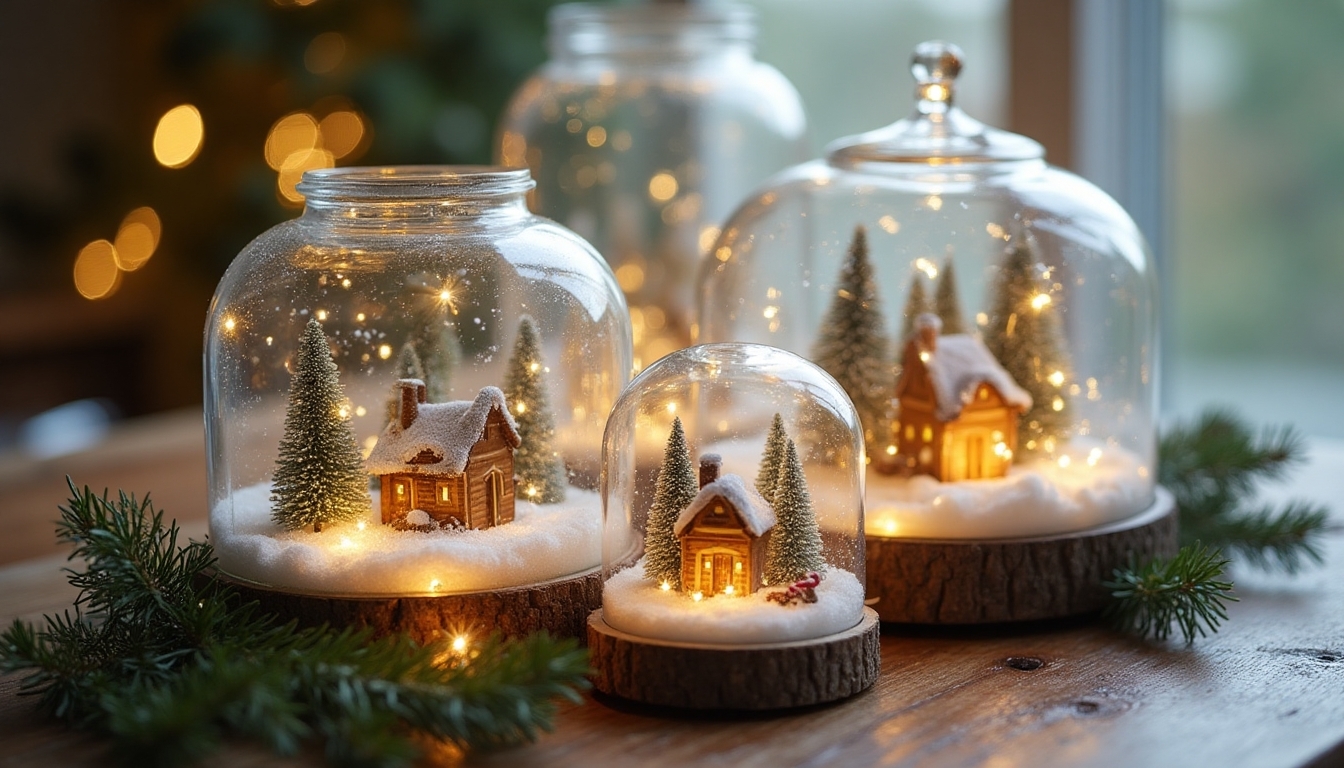
Childhood memories of shaking snow globes come alive in these charming DIY Mason jar versions. You’ll love creating these magical winter scenes that bring warmth and wonder to your holiday décor. They’re perfect for mantels, windowsills, or as heartfelt gifts for friends and family. Plus, you can enhance your creation with cozy Christmas bedroom decor ideas that complement your overall festive theme.
- Fill your clean Mason jar with distilled water, a dash of glycerin, and your choice of glitter or fake snow.
- Hot-glue miniature Christmas figures to the jar’s lid, creating your perfect winter scene.
- Seal the lid tightly, turn your creation upside down, and watch as sparkles dance around your winter wonderland.
Paper Snowflake Window Decorations
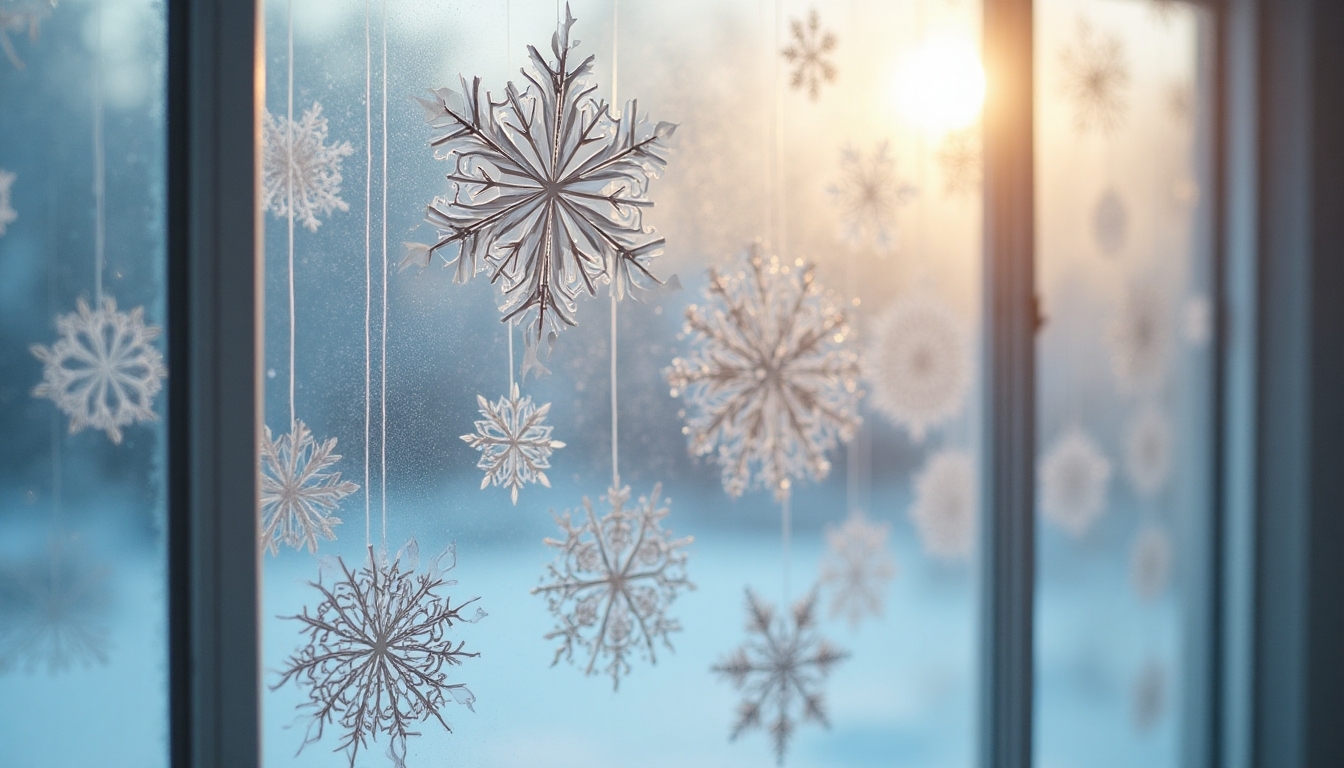
The magic of delicate paper snowflakes transforms ordinary windows into enchanting winter displays that’ll make your home feel like a cozy wonderland. Creating these beautiful decorations is easier than you might think, and you’ll love how they bring your whole family together for a fun crafting session.
Start with plain white paper squares, fold them diagonally several times, and cut small shapes along the edges. When you unfold them, you’ll reveal unique patterns that catch the light beautifully. Attach them to your windows with clear tape or removable adhesive, and watch as your space fills with the peaceful beauty of a gentle snowfall. For added charm, consider incorporating layered lighting to enhance the magical feel of your winter display.
Cinnamon Stick Candle Holders
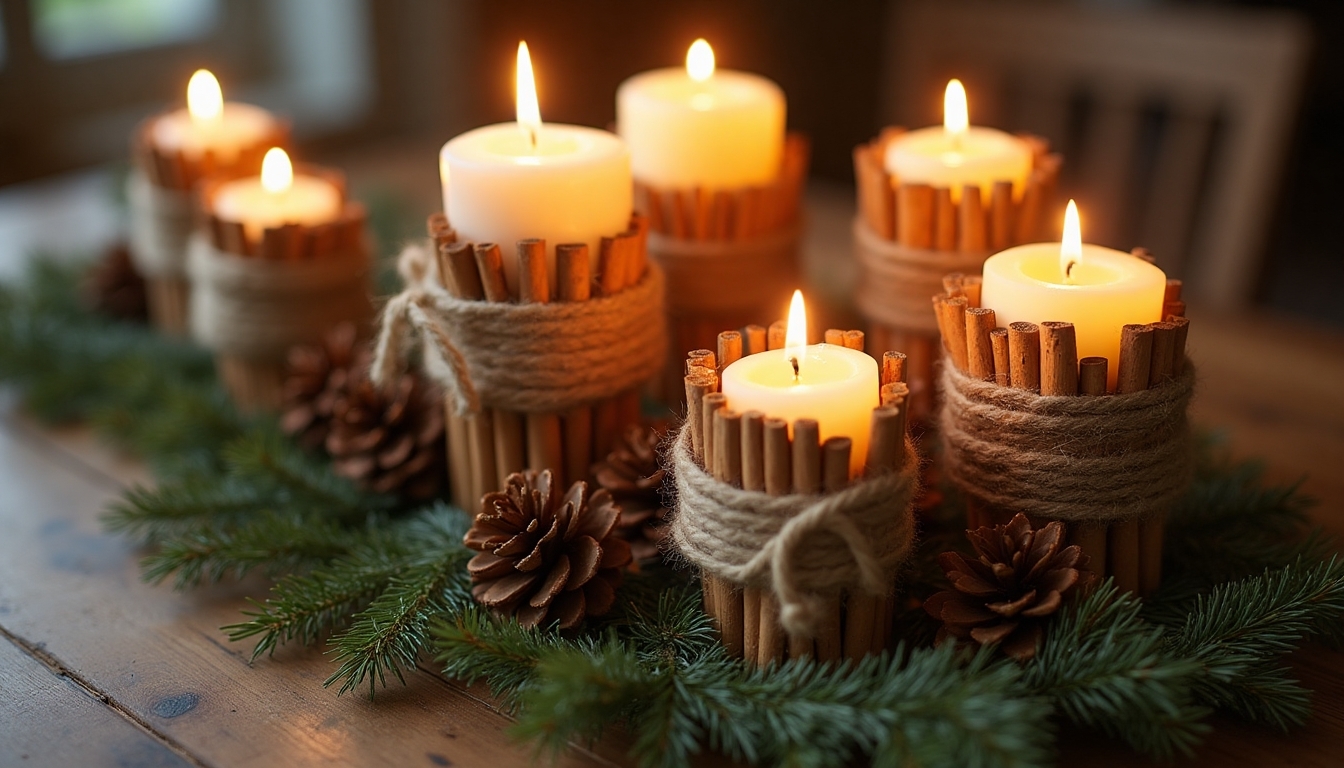
Simple cinnamon stick candle holders bring the cozy scents and rustic charm of the holidays right into your home. These delightful decorations fill your space with warmth and natural beauty, making them perfect for holiday gatherings or quiet evenings by the fire. Adding charming Christmas attic decor can enhance the festive atmosphere even further.
- Wrap cinnamon sticks around a glass votive holder using twine or a festive ribbon, securing them tightly as you work.
- Add seasonal embellishments like small pine sprigs, holly berries, or dried orange slices between the sticks.
- Place a battery-operated or regular candle inside, and watch as the gentle light creates magical shadows through the spaces.
Salt Dough Gift Tags and Ornaments
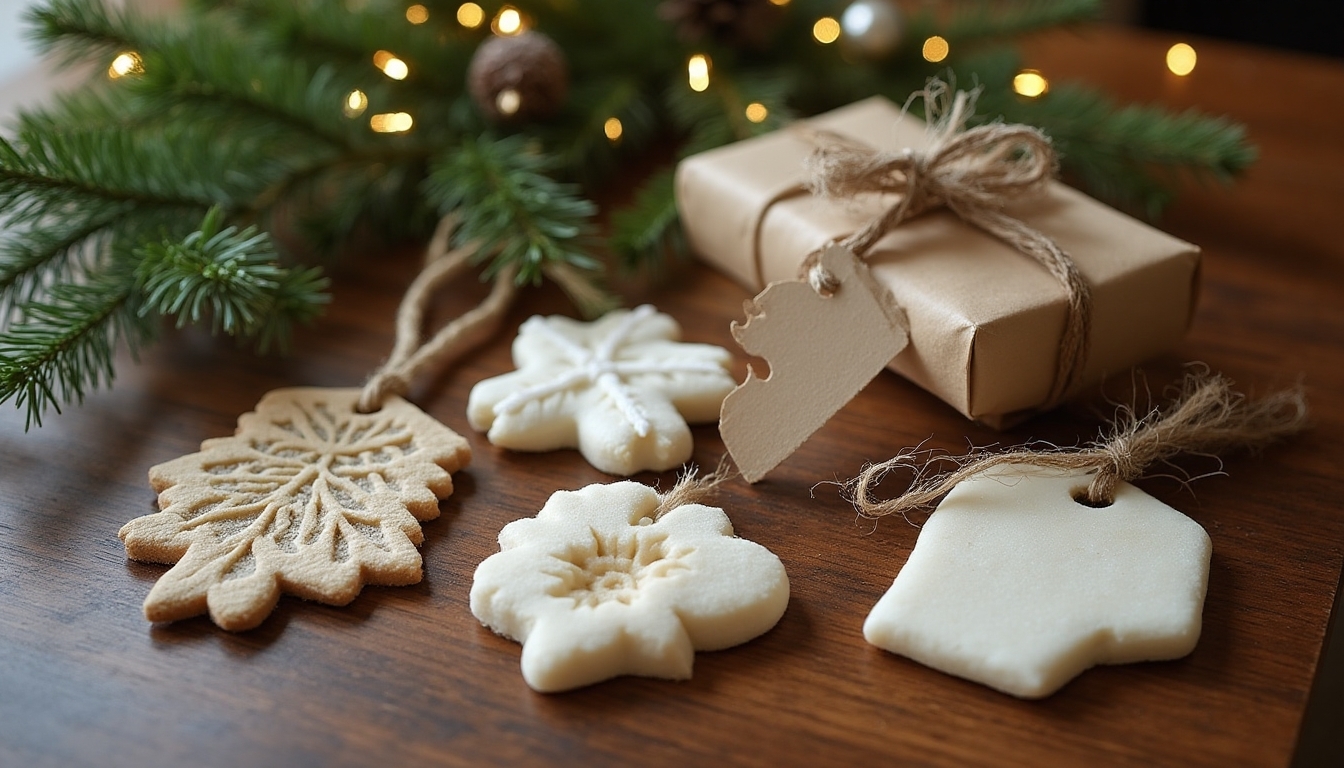
Making salt dough ornaments and gift tags brings back the heartwarming magic of traditional holiday crafting, letting you create personalized decorations that’ll last for years to come. With just flour, salt, and water, you’ll be crafting charming keepsakes in no time. Plus, you can enhance your festive display by incorporating Christmas garden decor elements to complement your handmade creations.
Mix 2 cups flour, 1 cup salt, and ¾ cup warm water until you’ve got a smooth dough. Roll it out to ¼-inch thickness, then cut shapes using cookie cutters or a knife. Don’t forget to make holes for hanging! Bake at 250°F for 2 hours, then let them cool before painting and sealing with clear varnish.
Frequently Asked Questions
How Long Can Homemade Christmas Decorations Typically Last in Storage?
Your homemade Christmas decorations can last for many years when you store them properly! Most handcrafted items will stay beautiful for 5-10 years if you keep them in airtight containers, away from moisture and direct sunlight. You’ll want to wrap delicate pieces in tissue paper, and it’s best to store them in a climate-controlled space. Remember to label your containers clearly, so you’ll know exactly what treasures you’ve tucked away for next season.
What Tools Should Beginners Have Before Starting DIY Christmas Decoration Projects?
“Well begun is half done,” as they say, and you’ll want to start your crafting journey with the right tools! You’ll need scissors, a hot glue gun, ruler, pencil, and a cutting mat as your basics. Don’t forget some wire cutters, pliers, and a good craft knife for detailed work. To make your projects easier, grab some paintbrushes, a stapler, and craft paper. These tools will help you create beautiful decorations with confidence!
Are These Decorations Safe to Make With Young Children Around?
You’ll want to carefully supervise any DIY projects when children are around, but many holiday decorations can be safely made together! Choose kid-friendly materials like paper, felt, and plastic ornaments instead of glass or sharp objects. If you’re working with items like scissors or hot glue, create a separate crafting space away from little ones. Make it a family activity by giving kids their own safe tasks, like arranging decorations or adding stickers.
How Early Should I Start Making DIY Decorations Before Christmas?
Envision this: your home slowly transforming into a winter wonderland, one handmade decoration at a time. You’ll want to start your DIY Christmas projects about 6-8 weeks before the big day, around mid-October. This gives you plenty of time to gather supplies, work at a relaxed pace, and enjoy the creative process without feeling rushed. You can even spread out different projects across weekends, making the holiday crafting experience more enjoyable and stress-free.
What Are the Best Ways to Protect Handmade Decorations From Humidity?
You’ll love how simple it is to protect your precious handmade decorations from humidity! Start by sealing your creations with a clear waterproof spray or mod podge, which creates a protective barrier. Store your decorations in airtight containers with silica gel packets to absorb excess moisture, and keep them in a cool, dry space. If you’re displaying them, try to place them away from windows and bathrooms, where humidity tends to gather.